
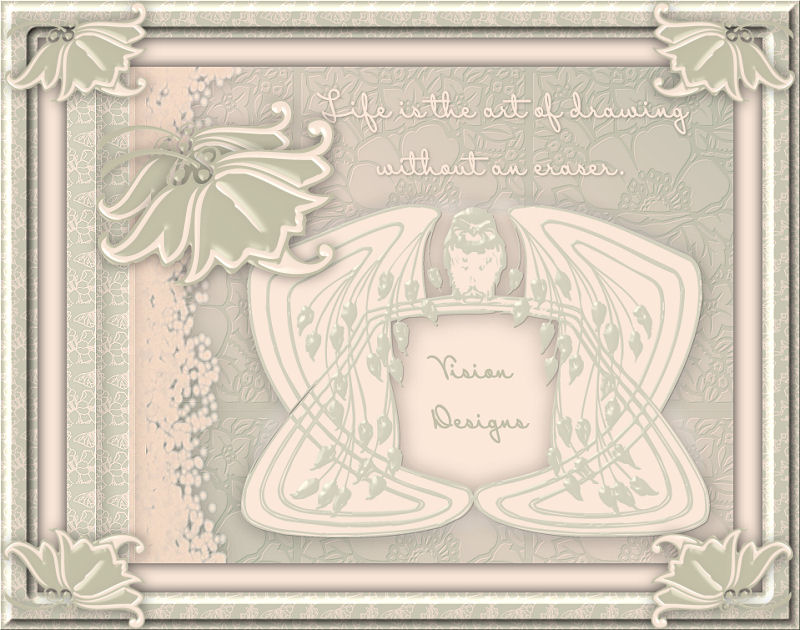
This beautiful 'Art Nouveau Scrap Kit' that I am using was designed by
Rachel Turner of 'Scrapbooking Freebies 4U'.
She has kindly given me permission to use it.
Thank You Rachel.
You may visit her site by clicking on the banner below.


Supplies Needed...
Paint Shop Pro - Version 10
Rachel Turners Art Nouveau Scrap Kit,
or you may use your own scraps.
FM Tile Tools - Blend Emboss
A tube of your choice, should you decide to use one.
Your favorite quote
Any other embellishments you'd like.
***Note***You will find that when you download and open 'Scraps'
from Scrapbooking sites that the contents are very LARGE.
What I have found to work best with PSP is to resize
them to the size of your working image...
This seems to work with things like mask-type images and papers, or backgrounds.
With elements, I usually resize them to 20% or less.
This may not apply to them all,
so check first to see if the file contents are too large..
to suit your particular needs.
Ok, Let's get started...
1.Open a new transparent image - 800x600.
We can resize later.
2. Floodfill with the Art Nouveau Kit back1.
Scale 23 - Angle 0
*Note* I will refer to the Art Nouveau Kit, as ANK, for the remainder of the tutorial.
3. Background Color - #d3d2be, from the ANKback6.
Foreground Color - #fbe8d9, from the ANKback7.
4. New Raster Layer.
Choose gradient.
Foreground - Background Gradient.
Angle 45
Repeats 0
Floodfill this layer with the gradient.
Reduce the opacity of this layer to 67.
Layers - Merge Visible.
5.Effects - Plugins - FM TileTools - Blend emboss.
Use the Default Settings.
Repeat this effect, one more time.
6. Open the ANKborder - Peach color.
Resize it so that the height is the same as your working image.
In our case - 600px.
Edit - Copy.
7.Activate your working image.
Edit - Paste as a new layer.
Move to the left.
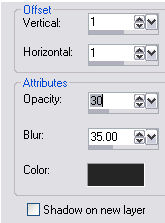
8. Effects - 3D Effects - Drop Shadow.
See Settings below...
9. New Raster Layer.
Selection Tool - Rectangle.
Draw a rectangle, approximately 50px wide, and the length of your working image.
Floodfill with the ANKback4.
Set the pattern to
Scale 10
Angle 0.
Selections - Select None.
10. Effects - 3D Effects - Drop Shadow.
Same settings as before.
11. Effects - 3D Effects - Chisel.
See Settings below...

12. Right-click on this layer - Duplicate.
Effects - 3D Effects - Drop Shadow.
Same settings as before.
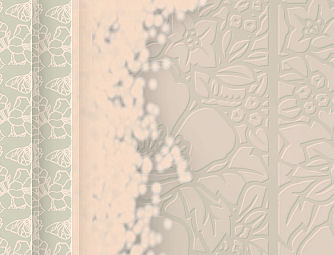
13. Move the layers, so that you get something like I have below...
14.Open the ANK frameback3.
Image - Resize - 25%, or to your own preference.
I found I was unable to just copy and paste these next two items,
so...Selections - Select All.
Selections - Float.
Edit - Copy.
15. Back to your working image.
Edit - Paste as a new layer.
16. Open the ANK frame3.
Image - Resize - 30%, or to your own preference.
Selections - Select All.
Selections - Float.
Edit - Copy.
17. Back to your working image.
Edit - Paste as a new layer, and place it over the back layer.
18. Highlight the Frame layer.
Effects - 3D Effects - Drop Shadow.
Same settings as before.
19. You may now add your name or your favorite tube.
Be sure to place it between the last two layers.
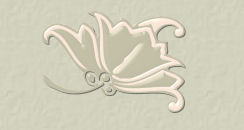
20. Open the ANK ornament1.
Image - resize - 25%.
Edit - Copy.
21. Back to working image...
Edit - Paste as a new layer.
Image - Flip
Move image to upper left corner.
Effects - 3D Effects - Drop Shadow.
Same settings as before.
*Note*...I decided to repeat step 21, one more time...
This time I enlarged it a small bit.
22. New Raster Layer.
Add your favorite quote.
23. Layers - Merge - All flattened.
24. Image - Add Borders - 35px - white.
Select and floodfill with color #fbe8d9.
Selections - Invert.
Effects - 3D Effects - Drop Shadow.
See settings below...
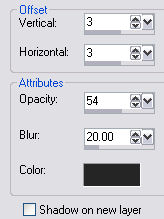
Repeat the Drop shadow, but change the V and H to minus 3.
Selections - select none.
25. Image - Add Borders - 35px - white.
Select and floodfill with ANKback4.
Scale 10
Angle - 0
Effects - 3D Effects - Inner Bevel.
See settings below...
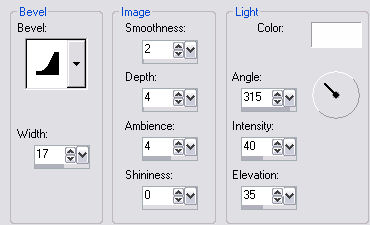
27. Resize and save as jpeg.
Thank you for trying my tutorial.



Dianne McFarlane
E-Mail: sdmcfarlane@nf.sympatico.ca
©Vision Designs
|