
For my tutorial page and in my tutorial,
I am using 'scraps' from Dozi's wonderful scrap site.
Thank you Dozi, for allowing us access to your lovely scraps.
You may visit here site by clicking on her name below...
Dozi's Scraps
Supplies Needed...
Paint Shop Pro - Version 10
A pretty floral graphic
Plugins:
Greg's Factory Output - Vol II - Pool Shadow
Filters unlimited - Distortion - Crumple
a-dozi's-battenburg-04
a-dozi's-lace-broad-stripes-06
a-dozi's-lace-frame-heart-03
Preset Shape - d30
You may download the shape
'here'
Unzip and put it in your preset shapes folder.
Ok ...Let's get started...
1. Open your graphic, and choose two soft colors,
for the foreground and background boxes.
Click on gradient, and choose the foreground/background gradient.
Style - Linear
Angle - 45
Repeats - 0
Invert - Unchecked
2. Open a new transparent image...800x600.
I like to work on a large area.
We can resize later.
3. New Raster Layer.
Floodfill with the gradient.
4. Selections - Select All.
Selections - Modify - Contract by 35.
Selections - Invert.
5. Effects - Plugins - Gregs Factory Output - Vol II - Pool Shadow.
Use default Settings.
Selections - Invert.
6. New Raster Layer.
7. Activate your chosen graphic.
Edit - Copy.
Activate your working image.
Edit - Paste into Selection.
Reduce the opacity of this layer to 36,
or a setting of your choice, to suit your particular graphic.
Keep Selected.
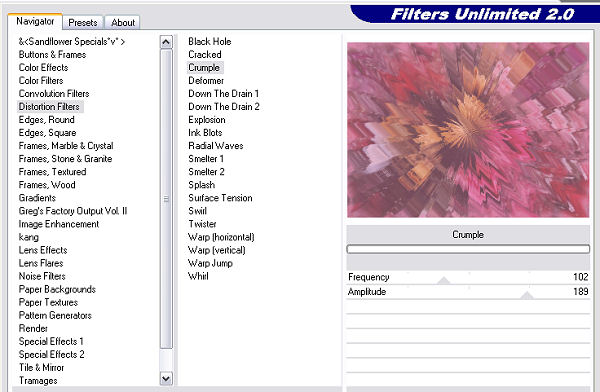
8. Effects - Plugins - Filters unlimited - Distortion - Crumple
See settings below...
Selections - Select none.
9. Make the background box in the Materials Palette null.
Be sure that the gradient is checked for the foreground box.
Change the repeats to 2.
Click on the preset shapes tool,
and choose the d-30 shape.
See settings below...

10. Draw your d30 shape to almost fit the size of the inner rectangle.
Use the vector handles to pull it out on the sides,
so it will sit evenly within the inner rectangle.
When satisfied with your positioning,
R-click on the vector layer, and convert to raster layer.
11. Still on this same layer...
Effects - Plugins - Gregs Factory Output - Vol II - Pool Shadow.
Use default Settings, except change the intensity and lightness to 98 or less,
depending upon how strong you wish the effect to be..
12. Still on this same layer, in the layer palette,
R-click on this layer - Duplicate.
Resize the new layer by 75%.
Resize - all layers - Unticked.
13. Open a-dozi's-battenburg-04.
Edit - Copy.
Make your working image active.
Edit - paste as a new layer.
Image - Resize - 66%.
Resize all layers - Unticked.
*Note* If you're using a different sized graphic from mine,
then you'll have to experiment with the resizing,
until it suits your particular image.
14. Still on the lace layer,
R-click on this layer - Duplicate.
Image - Flip.
15. Open a-dozi's-lace-broad-stripes-06.
Edit - Copy.
Make your working image active.
Edit - paste as a new layer.
Move this layer all the way to the top in your layer palette.
Image - Resize - 66%.
Resize all layers - Unticked.
16. Open a-dozi's-lace-frame-heart-03.
Edit - Copy.
Make your working image active.
Edit - paste as a new layer.
Image - Resize - 75%.
Resize all layers Unticked.
Repeat the resizing, one more time.
17. Still on the large heart layer,
with your magic wand, click in the center of the heart.
This will select just the center area of the heart.
New raster layer.
Floodfill with your gradient.
Keep selected.
Reduce the opacity of this layer to 67.
(or to a value of your choice)
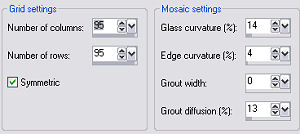
Effects - Texture Effects - Mosaic Glass.
See settings below...
Keep selected.
Effects - Texture Effects - Mosaic Antique.
See settings below...
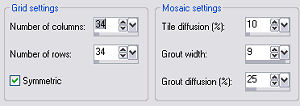
Selections - Select none.
18. In your layer palette,
move the heart layer all the way to the top.
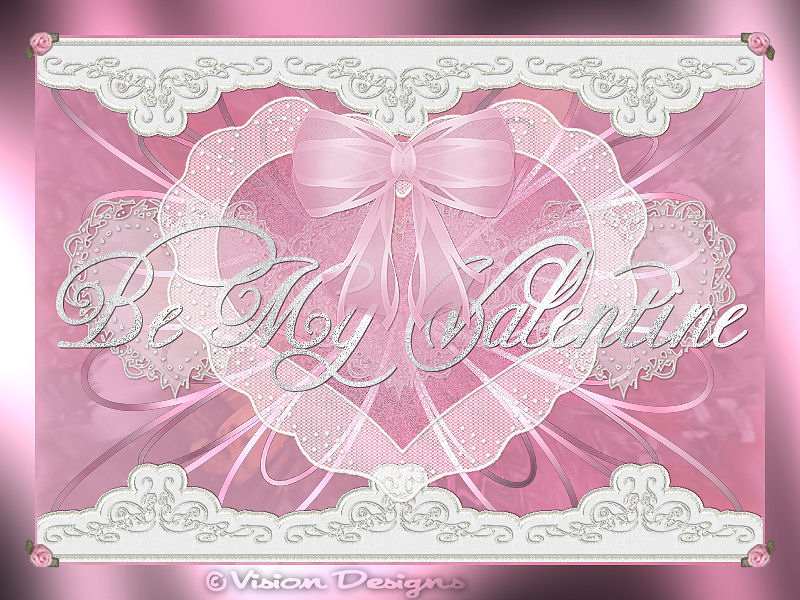
19. Add some Valentine text,
and a bow if you like.
I also added some of Dozi's baby roses to the corners.
20. Add your name or watermark, resize and save as a jpeg.
Happy Valentines Day




Dianne McFarlane
E-Mail: sdmcfarlane@nf.sympatico.ca
©Vision Designs
|