Ok ...Let's get started...
1. Open a new image. White background.
You will need to note the size of your graphic,
and make your new image quite a bit larger.
We can resize later...
This will be referred to as our main graphic.
2. New Raster Layer.
Floodfill with the teom_115 gradient.
Linear Style - Angle 0 - Repeats 0 - Invert-Unchecked.
3. Effects - Plugins - Filters Unlimited - Rag paper.
See settings below...
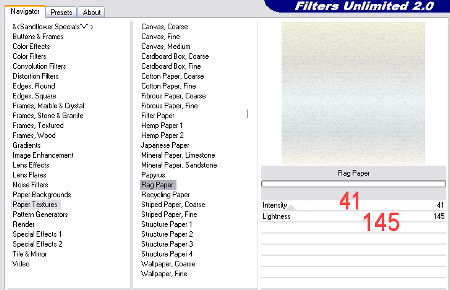
4. Selection Tool - Ellipse.
Draw an ellipse in the center of your main graphic.
Keep selected.
5. New Raster Layer.
Floodfill with the silverfoil.
This doesn't really show at the end,
but I found it looked better with the next step.
6. Effects - Plugins - Super Blade Pro.
Choose the D_Silver Shimmer.
See Settings below...
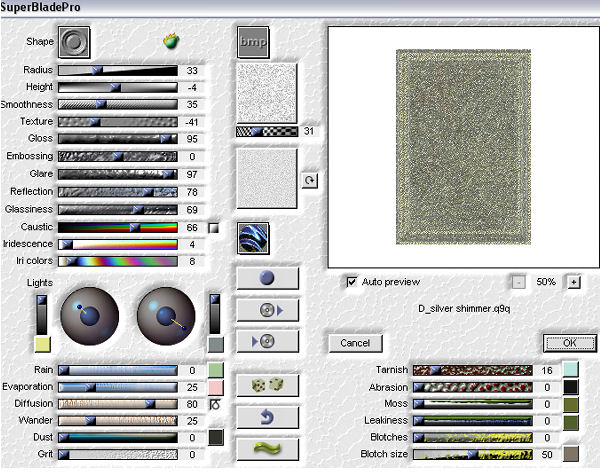
7. Selections modify - Contract by 10.
Hit your delete key.
Keep selected.
8. Open your chosen graphic.
Edit - Copy.
Activate your main graphic.
Edit - Paste into selection.
Keep selected.
9. Effects - 3D Effects - Inner Bevel.
See settings below...
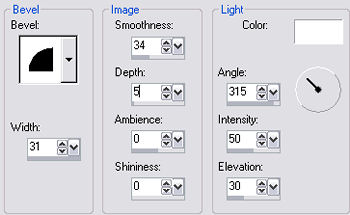
Selections - Select none.
10. Open the corner epw-185.
Duplicate and close the original.
Effects - Plugins - Super Blade Pro.
Same settings as before.
Effects - 3D Effects - Inner Bevel.
See settings below...
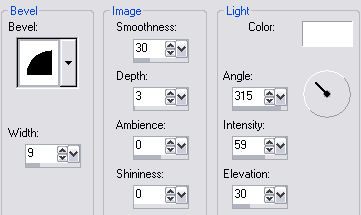
11. Place the corners on your main graphic,
as shown on my finished frame.
12. Image - Add Borders - 10px.
Select and floodfill with the silverfoil.
Effects - Plugins - Super Blade Pro.
Same settings as before.
Keep selected.
13. Effects - 3D Effects - Inner Bevel.
Same settings as in Step 10.
Selections Invert.
14. New Raster Layer.
Effects - 3D Effects - Cutout.
See settings below...
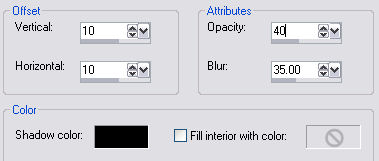
15. New Raster Layer.
Repeat Cutout, but change the V and H to minus 10.
Selections - Select none.
16. Layers - Merge - All Flattened.
17. Add your name or watermark.
Resize and save as a jpeg.
Hope you enjoyed doing this tutorial.
'Merry Christmas'