
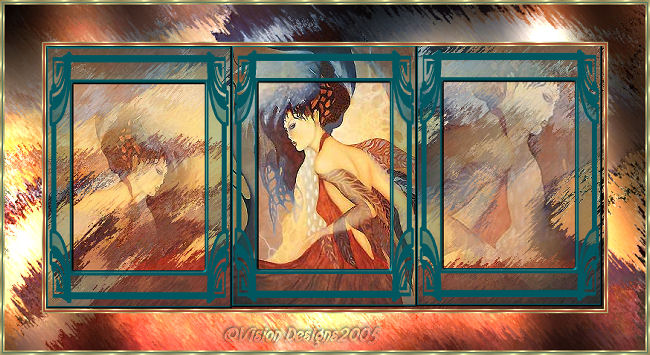

I wrote this Frame Tutorial for my sister Gayle.
Supplies Needed...
Paint Shop Pro - Version X
Graphic of your choice.
NOTE...Try to choose a graphic that is not too wide.
Mine measures 250x354.
Gold Fill Pattern.
Plugin - Brushstrokes
Gregs Factory Output Volumn II - Pool Shadow
Art Deco Mask
You may get the mask'here'.
1. Open your graphic. Duplicate twice, and close the original.
2.With your graphic active...
New raster layer.
Floodfill with black or a dark color from your graphic.
3. Layers - Load mask from disk.
Choose the 'art-deco' mask.
Layers - Merge group.
*NOTE* Do not merge all just yet...*S*
4. In layer palette - Highlight the mask layer.
Effects - 3D effects - Inner Bevel.
See settings below.
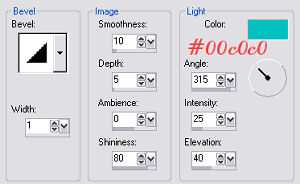
Set this image aside for the moment.
We will refer to this as the 'masked image'.
5. Open a new transparent image, three times the width
of your graphic, and the same height.
Don't worry if it's too large, as we will resize later.
6. Selections - Select all.
7. Open up your duplicated graphic.
Edit - Copy.
8. Make your new transparent image active.
Edit - Paste into selection. It will be very distorted.
Image - Mirror.
We will refer to this as the 'large image'.
9. Effects - Plugins - Brushstrokes - Sprayed Strokes.
See settings below.
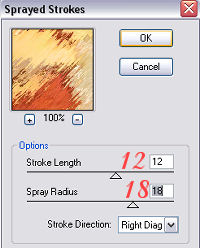
Selections - Select none.
10. Make your 'masked image' active
Edit - Copy.
11.Make your 'large image' active.
Edit - Paste as a new layer.
*NOTE* It will only be the masked layer that was copied.
Slide this image all the way to the left.
12. In the layer palette - Right-click on raster layer 2 - Duplicate.
Move this all the way to the right.
13. Make the 'masked image' active again.
Layers - Merge visible.
Edit - Copy.
14. Make your 'large image' active.
Edit - Paste as a new layer.
*NOTE* You may have to use the mover tool to gently
ease the three layers so they look even.
15. Now... You may use tubes, brushes, etc
to place in the spaces of the two side frames,
or follow the next few steps to do as I have.
16. With the duplicated graphic active...
Mist part of the graphic as follows...
Using the Freehand Selection Tool, feather set at 30,
closely trace around the part of the graphic
you like the best. In my graphic, I chose the face.
Edit - Copy.
17. Activate your 'large image'
Edit - Paste as a new layer.
Move into the left masked area.
Reduce the opacity of this layer to 48.
18. Mist another portion of your duplicated graphic.
Copy and paste it as a new layer into the right side
of the 'large image'.
Image - Mirror.
Image - Resize - 150%...(resize all layers, unticked)
19. Move this layer below the mask layer.
Reduce the opacity of this layer to 34.
*NOTE* If the first image you place to the left is large,
you may have to move it down as well.
Your layer palette should resemble my screenshot below.
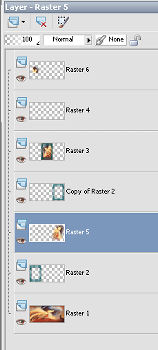
20. Highlight raster layer 1 (the background layer)
Edit - Copy - just leave it for the moment.
21. Layers - Merge all flattened.
22. Image - Add borders - white - 2 px.
Select and floodfill with the goldfill.
23.Image - Add borders - white - 2 px.
Select and floodfill with the red (or a color from your graphic).
24. Repeat Step 22.
25. Image - Add borders - white - 50px.
Select - New raster layer.
26. Edit - Paste into selection
27. Effects - Plugins - Gregs Factory Output - Vol II - Pool Shadow.
See settings below.
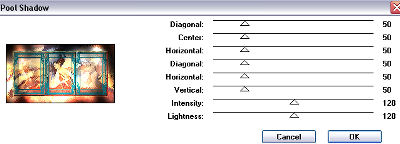
Repeat this effect once.
Layers - Merge all flattened.
28. Repeat Step 22.
29. Repeat Step 23, but choose another color from your graphic.
30. Repeat Step 22.
31. Resize. Add your watermark, or your name, and save as a jpeg.
Thank you for doing this tutorial, I hope you enjpoyed it....

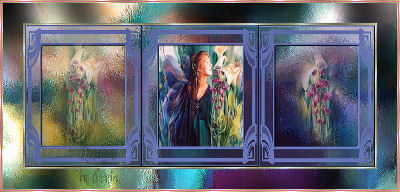
Below is the wonderful results from Gayle.
I'm soo pleased she liked the tutorial.
Thank you Gayle.


Dianne McFarlane
E-Mail: sdmcfarlane@nf.sympatico.ca
©Vision Designs
|