
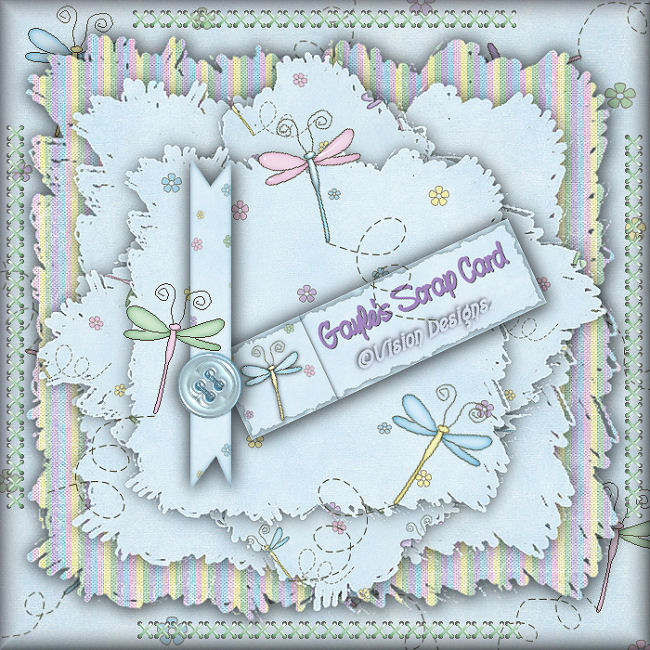

I wrote this Tutorial for my sister, Gayle's Birthday.
Hope you like it, Sis...
I am using a Scrap Kit, with permission from 'Monti's Pixel Playground'.
Thank you Monti.
You may click on her name below to take you to her site.
Just click on Scrap Kits to the left, and choose whatever you wish.
She has some lovely kits to choose from.
I chose to use the 'DragonFlies'

Supplies Needed...
Paint Shop Pro - Version 10
A Scrap Kit.
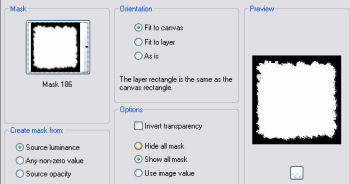
Mask 186 - This is a psp10 mask, but I have included it below, for those who may not have it.
Just unzip, and place it in your Mask Folder
You may download the mask
'here'
Ok, Let's get started...
1. Unzip the MontiDragonfly Papers, Ribbons and Extras.
Open everything you wish to use in psp.
2. Open up a new transparent image, 700x700px.
3. Floodfill this Layer with the MontiDragonflies Paper.
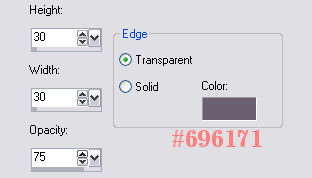
Effects - 3D Effects - Buttonize.
See Settings below...
4. New raster Layer.
Floodfill with the Stripe Paper.
5. Layers - Load/Save mask - Load mask from disk.
Choose the Mask186.
See Settings below...
Layers - Merge Group.
Effects - 3D Effects - Drop Shadow.
See Settings below...
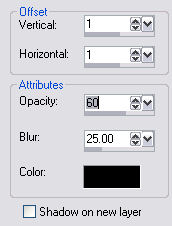
Apply this Drop Shadow, once more.
6. New raster Layer.
Floodfill with the 'Blue Paper'
7. Apply Mask as in Step 5.
Merge Group.
8. Image - Resize 85% - All layers unticked.
9. Effects - 3D Effects - Drop Shadow.
Same Settings as before.
10. New raster Layer.
In materials palette, choose pattern and set the scale to 60.
Floodfill with the Dragonflies Paper.
11. Repeat Step 5.
12. Image - Resize - 75%.
Adjust Sharpness - Sharpen.
12. Image - Free Rotate - Left - 50.
Resize all layers - Unticked.
Adjust Sharpness - Sharpen.
13. New raster Layer.
In Materials Palette, choose pattern, and set the scale back to 100.
Floodfill with the Flowers Paper.
14. Repeat Step 5.
Image - Resize - 65%.
Adjust Sharpness - Sharpen.
15. Open up the 'Cross Stitch'.
Edit - Copy.
Activate your main image.
Edit - Paste as a new layer.
I decided to place mine along the edges.
16. Open up the MontiDragonfly Tag.
With the Text Tool, add whatever wording you prefer.
17. Close off all of the layers, except for the tag and your wording.
Layers - Merge Visible.
18. Make certain the Tag Layer is active.
Image - Free Rotate - Left - 25.
All layers - unticked.
Place your tag to your liking.
Adjust Sharpness - Sharpen.
19. You may then choose whatever other embellishments you prefer,
and place them where you would like.
20. Merge - All Flattened.
21. Add you name or watermark. Resize, and save as a jpeg.
Thank you for trying my tutorial.
I hope you enjoyed it.


Dianne McFarlane
E-Mail: sdmcfarlane@nf.sympatico.ca
©Vision Designs
|