

Supplies Needed
Paint Shop Pro - Version 9
Graphic of your choice.
Gold Fill Pattern.
Gold Corners of your choice.
Plugin - Brushstrokes
1. Open your graphic. Duplicate twice, and close the original.
2.On your graphic, with the freehand selection tool,
feather set at 30, trace closely
around the main focal part of your graphic.
Don't worry if it's not centered,
as we will fix that later.
3. Selections - Invert. The selected section may look
a little small, but in the end, the feathering will make it look just fine.
4. Adjust - Blur - Gaussian Blur - Radius 10.
Selections - Select None.
5. Selection Tool - Circle - Feather 0.
Draw a circle around the main portion of the graphic.
Try not to be toooo near the top, bottom or sides,
as we need a little room to continue.
6. New Raster Layer.
Floodfill with the gold fill
Angle - 0
Scale - 60
Selections - Modify - Contract by 1.
Hit your delete key.
Keep Selected.
7. Selections - Modify - Expand by 5.
New Raster Layer.
Flood fill with the gold fill.
Selections - Modify - Contract by 1.
Hit your delete key.
Keep Selected.
8. Repeat Step 7.
Selections - Select none.
9. In layer palette, click on Raster Layer 2 to make it active.
*Note*...This will be the layer with your first circle,
the one you made in Step 6...
With magic wand, click in center of circle.
New Raster Layer.
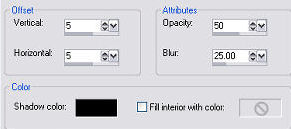
Effects - 3D effects - Cutout.
See settings below.
10. New raster Layer.
Repeat cutout, but change the V and H to minus 3.
Selections - Select None.
11. Layers - Merge - All Flattened.
12. Using the Selection Tool, choose either rectangle, or square.
This will depend upon the graphic you've chosen.
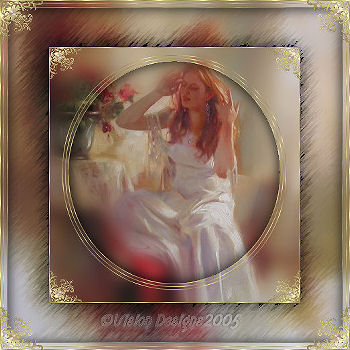
Crop the graphic, so that the circled parts are centered.
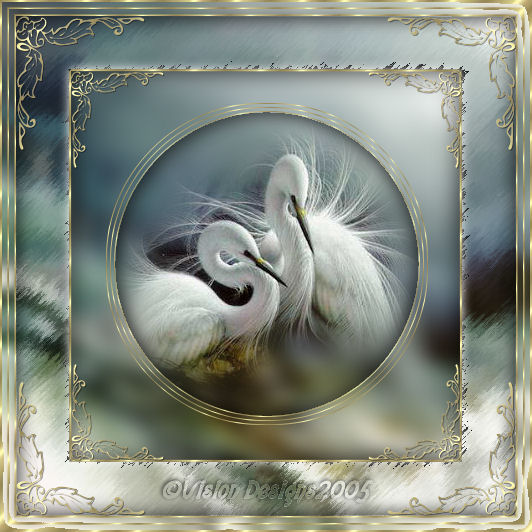
You can check my finished frame result, to see what I did.
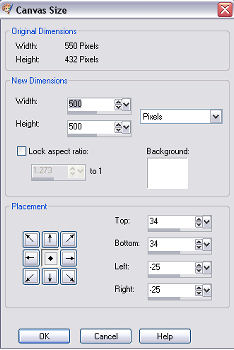
13. Image - Canvas Size - Increase the area around the graphic.
See settings below.
14. With the magic wand, select the white.
New Raster Layer.
15. Highlight the duplicate copy.
Adjust - Blur - Gaussian Blur - Radius 5.
Edit - Copy.
16. Highlight your main graphic.
Edit - Paste into selection.
17. Effects - Plugins - Brushstrokes - Use 'Sprayed Strokes'
See Settings below.
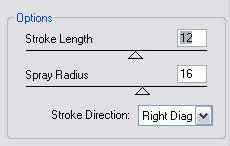
You may wish to play with the settings a little,
it will depend upon your graphic.
Apply this effect twice
Keep Selected.
18. Selections - Invert.
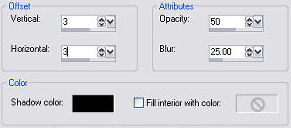
Effects - 3D Effects - drop shadow.
See settings below.
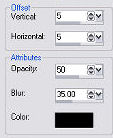
Repeat drop shadow, but change the V and H to minus 5.
Keep selected.
19. New raster Layer.
Selections - Modify - Expand by 2.
Floodfill with the goldfill.
Selections - Modify - Contract by 2.
Hit your delete key.
Selections - Select none.
20. Layers - Merge all flattened.
21. In layer palette - Promote background to layer.
22. Image - Add borders - white - 2 px.
Select and floodfill with the goldfill.
Selections - Invert.
23.New Raster Layer.
Effects - 3D effects - Cutout.
See Settings below.
Repeat cutout, but change the V and H to minus 5.
Selections - Select none.
24. Layers - Merge all flattened.
25. Image - Add borders - white - 5px.
Select. Paste into selection.(the previous copy should still be in psp memory).
Selections - Select none.
26. Image - Add borders - white - 2px.
Select and floodfill with the gold.
27. Repeat Step 25.
28. Repeat Step 26.
29. Add some decorative corners.
30. Add your name or watermark.
Resize and save as jpeg.
I hope you enjoyed making this tutorial....
Below is another one that I did, using red tones.


Dianne McFarlane
E-Mail: sdmcfarlane@nf.sympatico.ca
©Vision Designs
|