Ok, Let's get started.
Supplies
Paint Shop Pro - Version 9
A graphic of your choice.
*note* One with lots of color works best.
Goldfill
Decorative Corners of your choice.
Plugins...
Paint Engine - Flakes
Eye Candy 4000 - Marble
1. Open your graphic. Duplicate twice, and close the original.
Minimize one copy for now.
Promote background to layer, if necessary.
2. Selection Tool - Ellipse.
Materials Palette - Set Foreground to pattern,
and chose the Goldfill.
Set scale to 50.
3. Set Background to a complimentary color from your graphic.
4. Draw an ellipse - centered on your graphic.
5. New Raster Layer - Floodfill with the goldfill.
6. Selections - Modify - Contract by 2.
Hit your delete key.
Keep selected.
7. New Raster Layer - Floodfill with your complimentary color.
Selections - Modify - Contract by 5.
Hit your delete key.
Keep selected.
8. Repeat Steps 5 and 6.
Keep selected.
9. Selections modify - Expand by 9.
Selections - Invert.
Keep selected.
10. In Layer Palette - Make Raster Layer 1 active.
11. Adjust - Blur - Gaussian blur - Radius 10.
12. Effects - Plugins - Eye candy 4000 - Marble.
See settings below...
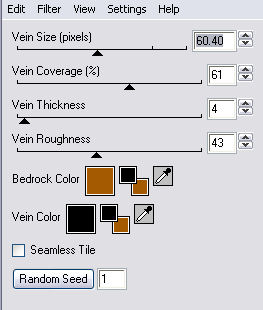
Apply this effect once more.
Keep selected.
13.Repeat Step 11.
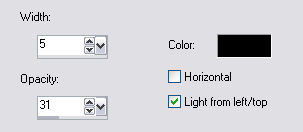
14. Effects - Texture Effects - Blinds.
See settings below...
Selections - Select none.
15. Layers - Merge - All Flattened.
16. Image - Add Borders - 2px - white.
Select and floodfill with goldfill.
Keep selected.
17. Effects - 3D effects - Drop shadow.
See settings below...
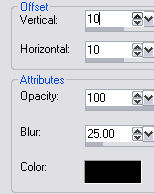
Repeat 'drop shadow', but change the V and H to minus 10.
Selections - Select none.
18. Image - Add Borders - 10px - white.
Select and floodfill with your complimentary color.
Selections - Select none.
19. Repeat Step 16.
Selections - Select none.
20. Activate the minimized copy of you graphic.
Edit - Copy.
21. Back to main graphic.
Image - Add Borders - 25px - white.
Select with magic wand.
22. Edit - Paste into selection.
Adjust - Blur - Gaussian Blur - Radius 10.
23. Effects - Fantastic Machines - Flakes.
See Settings below...
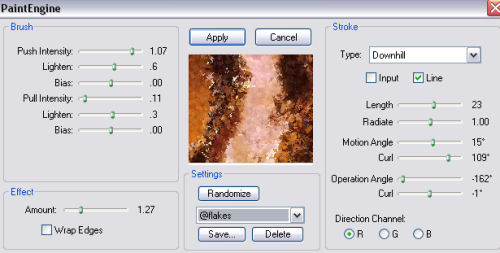
If you don't have the 'flakes' settings. Copy my settings
and save as 'flakes', when you have your Fantastic Machines open.
Repeat this effect one more time.
Keep Selected.
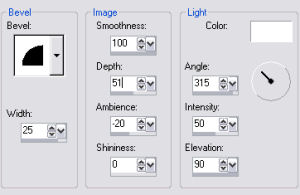
24. Effects - 3D effects - Inner Bevel.
See settings below...
Selections - Select None.
25. Image - Add Borders - 2px - white.
Select and floodfill with goldfill.
Selections - Select none.
26. Image - Add Borders - 10px - white.
Select and floodfill with your complimentary color.
Selections - select none.
27. Repeat Step 25.
28. Image - Add Borders - 45px - white.
Select.
Repeat Steps 22 and 23.
Keep selected.
29. Repeat Step 12.
30. Repeat Step 24.
31. Repeat Steps 25, 26 and 27.
32. Add decorative corners of your choice.
33. Add your name or watermark.
Resize and save as jpeg.
Thankyou for trying my tutorial.