


Supplies Needed...
Paint Shop Pro - Version 9
Gold Fill
Plugins: Fantastic Machines: Flakes and Watercolor2
Xenofex2 - Crumple
A floral tube of your choice.
*Note* Choose a tube that has a smooth edge.
Heart Preset Shape
You may download the heart
'here'
Unzip and put it in your preset shapes folder.
Ok ...Let's get started...
1. Open a new transparent image, 600x600.
We can resize later.
2. Open your floral tube.
Duplicate twice and close the original.
Choose two colors, from your tube, a light and a dark,
for the foreground and background.
Set your materials box to gradient.
Choose the foreground and background gradient.
Minimize the tube for the moment.
3. Activate the transparent image.
Floodfill with your gradient.
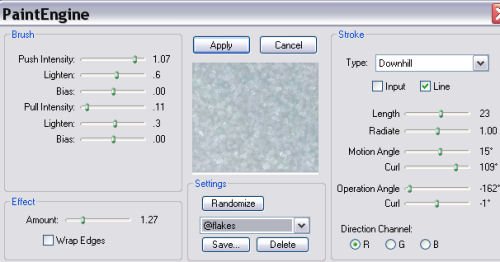
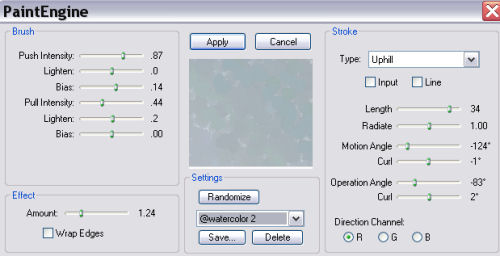
Effects - Plugins - Fantastic Machines - Flakes and then apply watercolor2.
See Settings below...
4. New Raster Layer.
5. Foreground - Goldfill.
Background - Null.
6. Preset Shape tool - Choose the heart-1.
See settings below...

Draw a heart shape to nearly fill the 600x600 space.
Use the vertical and horizontal tabs on the vector box to adjust your size.
When happy with your size and shape on the Vector layer,
convert to Raster Layer.
7. New Raster Layer.
Preset Shape Tool - Same settings, except change the width to 8.
Draw another heart shape inside the first heart.
Repeat the Vector Box adjustments.
When happy, convert to Raster Layer.
8. Repeat Step 7, but change the width to 6.
You should have something like mine below...

9. Close off the background layer and Merge Visible the heart layers.
10. Effects - 3D effects - Drop Shadow.
See settings below...

Set aside for the moment.
11. Activate your tube image.
We want to add some golden edges to your floral.
I found a great tutorial for this, and have gotten permission from Monique
to add her link in my tutorial.
You may reach her 'anne' tutorial
'HERE'.
Unfortunately, this link is not working at the moment.
Until I can contact this person, or write how I did the golden edges,
I would suggest that you just use a plain tube,
without adding the golden edges to it.
When satisfied with your results...Edit - Copy.
12. Activate your 'hearts'image. Edit - Paste as a new layer.
Repeat the same drop shadow.
Layers - Merge - All Flattened.
13. Foreground - Goldfill.
Background - The deeper color from your tube.
Activate the Text Tool.
See Settings below...

Choose your favorite Valentine Quote.
14. Effects - 3D effects - Drop Shadow.
Same settings as before , but change the blur to 1.
Layers - Merge - All Flattened.
15.Image - Add borders - 2px - white.
Select, and floodfill with the goldfill.
16. Selections - Invert.
17. Effects - 3D Effects - Cutout.
Use the deep color from your tube for the shadow color.
See Settings below...

Repeat the cutout, but change the V and H to Minus 10.
Selections - Select none.
18.Image - Add borders - 6px - white.
Select, and floodfill with the deeper color.
Selections - Select none.
19. Repeat Step 15.
Selections - Select none.
20. Image - Add borders - 80px - white.
Select, and floodfill with your softer color.
Keep selected.
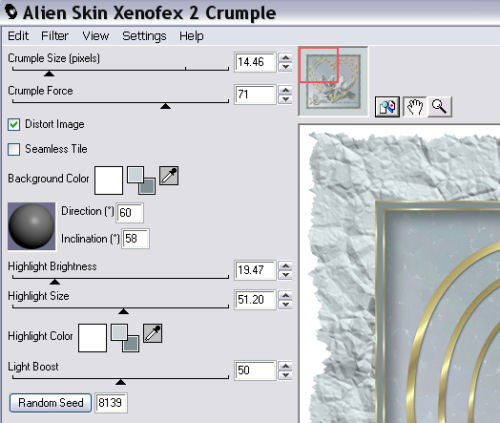
21. Effects - Xenofex2 - Crumple.
See Settings below...
Selections - Select none.
22. With your magic wand, select the white edge.
Selections - Modify - Expand 4.
Floodfill with the goldfill.
23. Selections - Modify - Contract 3.
*NOTE*...Your deeper color should be in the background box.(in the materials palette)
Hit your delete key.
You should be showing the deeper background color,
with a gold border. If not, just simply add them...
24. Add your name or watermark.
Resize and save as a jpeg.

Below is another one that I made...


Dianne McFarlane
E-Mail: sdmcfarlane@nf.sympatico.ca
©Vision Designs
|