

Ok, Let's get started.
Supplies
Paint Shop Pro - Version 9
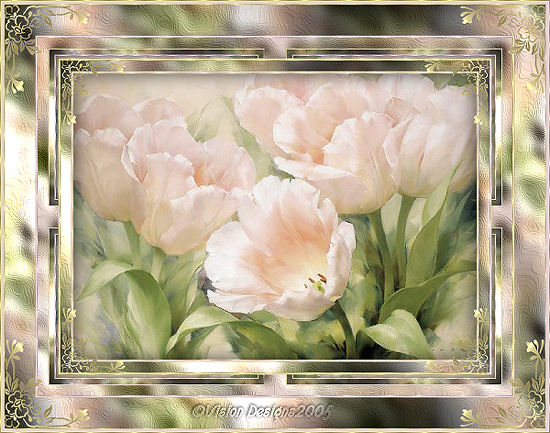
A graphic of your choice.
Goldfill
Decorative Corners of your choice.
Plugins...
Gregs Factory Output Vol II - Pool Shadow
Simple - Quick Tile
Graphics Plus - Quick Tile I
1. Open your graphic. Duplicate twice, and close the original.
2. On your main graphic, using the selection tool,
set at 'rectangle', select a portion of your graphic.
Edit - Copy.
Edit - Paste as a new image.
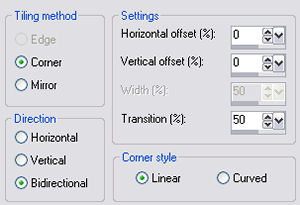
Make this tile seamless.
Effects - Image effects - Seamless Tiling.
See settings below...
3. Back to main graphic.
Selections - Select none.
4. Image - Add borders - 1px - white.
Select and floodfill with your goldfill.
5. Selections Invert.
6. Effects - 3D effects - Cutout.
See settings below...
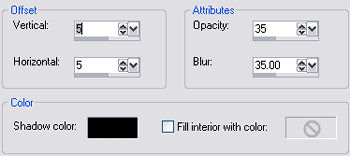
Repeat the cutout, but change the V and H to minus 5.
Selections - Select none.
7. Choose a complimentary color from your graphic,
for the background color.
8. Image - Add borders - 2px - white.
Select and floodfill with your chosen color.
Selections - Select none.
9. Repeat Step 4.
10. Image - Add borders - 15px - white.
Select, and floodfill with the new seamless tile
that you made in Step 2.
Keep Selected.
11. Effects - Artistic Effects - Topography.
See settings below...
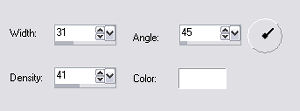
Repeat this effect once more.
Keep selected.
12. Effects - Plugins - Gregs Factory Outout - Vol II - Pool Shadow.
Use default settings.
Selections - Select none.
13.Repeat Steps 4 and 8.
Repeat Step 4 once more.
Selections - Select none.
14. Image - Add borders - 30px - white.
Select with magic wand.
Effects - Plugins - Graphics Plus - Quick Tile I.
Use default settings.
Selections - Select none.
15. With magic wand, select the white area remaining from Step 14.
Floodfill with your complimentary color.
Keep selected.
16. Effects - Plugins - Simple - Quick Tile.
Apply.
17. Repeat Step 11.
Selections - Select none.
18. Repeat Steps 4 and 8.
Repeat Step 4 again.
Selections - Select none.
19. Image - Add borders - 45px - white.
Select, and floodfill with your new seamless tile.
Selections - Select none.
20. Repeat Steps 11 and 12.
21. Repeat Step 4.
22. Repeat Step 8, but change the width to 5 px.
23. Repeat Step 4.
24. Add some decorative corners.
25. Add your name or watermark.
Resize and save as a jpeg.
Thank you for trying my tutorial.


Dianne McFarlane
E-Mail: sdmcfarlane@nf.sympatico.ca
©Vision Designs
|