Ok ...Let's get started...
1. Open a new transparent image - 650x450.
Don't worry about the size, as we can adjust it later, if necessary.
First, we're going to make the ribbon.
2. New Raster Layer.
3. Effects - Plugins - Dragonfly - Sinedot II.
I kept it red, so I could easily see how the ribbon
was shaping, as I was making it.
Going to change it to white in a few moments.
See settings below...
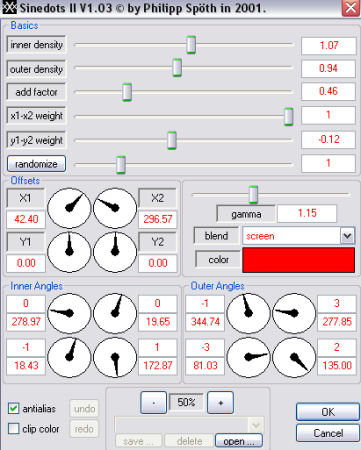

4. Image - Resize - 65%.
Resize all layers - unticked.
5. Use the Deform Tool to lengthen and turn your image.
See screenshot below...
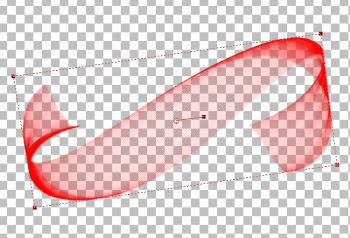
6. Adjust sharpness - Sharpen.
7. Adjust - Hue/Saturation/Lightness.
See settings below...
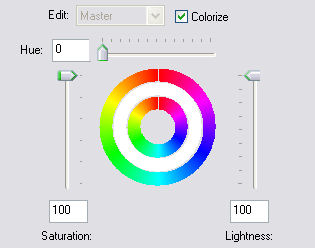
This will turn your ribbon image white.
8. You may use your own preference for coloring it.
I used SBP on mine.
Effects - Plugins - Super Blade Pro - D_silver shimmer.
See settings below...
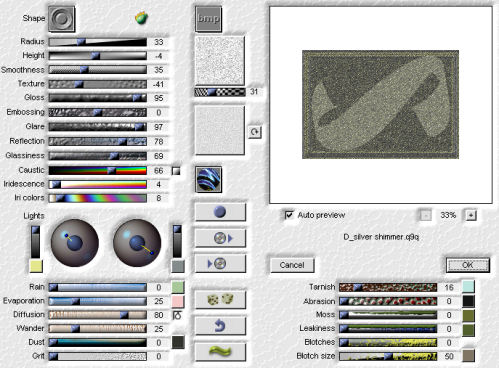
9. Effects - 3D Effects - Drop Shadow.
See settings below...
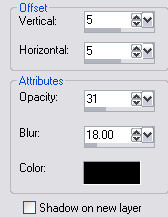
10. Click on Raster Layer 1 - Our background layer, just below the ribbon.
11. Floodfill this layer with a color or pattern of your choice.
I chose to use a blue - #6587ad.
12. Effects - Plugins - Filters Unlimited - Sand Flower Specials - Pool Shadow Framed.
See settings below...
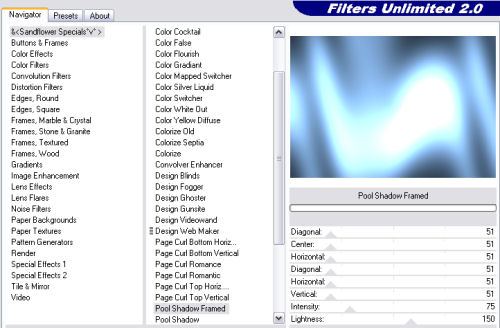
13. Open your 'Snowflakes'.
14. Activate one of them.
In layer palette - Right click and promote to layer.
You will be asked to 'promote to 16 million colors' - Click ok.
With magic wand, click anywhere in the white part of the snowflake.
Edit - Copy.
15. Activate your main graphic.
Edit - Paste as a new layer.
16. Image - resize - 60%.
Resize all layers - unticked.
17. Effects - Plugins - Eye Candy 4000 - Glass.
See settings below...
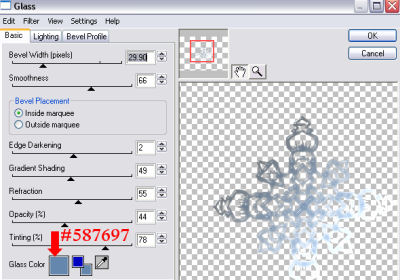
18. Effects - 3D Effects - Drop Shadow.
Same settings as before.
19. Using the other two snowflakes,
Repeat Steps 14, 15, 16, 17 and 18.
Make these two slightly smaller,
and position them as shown in my final image above.
20. In layer palette, change the Blend Mode
on the three snowflake layers to 'Hard Light'.
21. Add your favorite 'seasonal'saying.
Color the text to your liking.
I used SBP on mine.
Repeat the drop shadow from Step 9.
22. Layers - Merge - All flattened.
23. Image - Add borders - 2px - white.
Select and apply the SBP (step 8).
Selections - Select none.
24. Image - Add borders - 5px - white.
Select and floodfill with a color from your background.
Selections - Select none.
25. Repeat Step 23.
26. Image - Add borders - 45px - white.
Select and floodfill with the color from your background.
Keep selected.
27. Repeat Step 12 - The Pool Shadow.
Keep selected, and repeat this step one more time.
I also added a little snow. *S*
Selections - Select none.
28. Repeat Steps 23, 24 and 25.
Then repeat Steps 24 and 25 once more.
29. Add your name or watermark.
Resize to your liking.
Adjust Sharpness - Sharpen.
30. We're going to add some sparkle to our snowflakes.
First we need to select the snowflakes.
Using your magic wand - tolerance 36.
*note* You may need to adjust the tolerance setting,
it will depend upon your image.
Hold down the shift key, and keep selecting
until you have all three snowflakes totally selected.
Keep selected.
31. In layer palette...
Duplicate the background.
I usually do three copies.
See screenshot below...

32. Highlight Background Layer.
Adjust - Add/Remove noise - Add Noise.
See settings below...
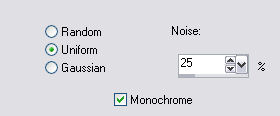
Keep selected.
33. In layer palette, highlight 'Copy of Background'.
Add noise, but change the percentage to 30%.
Keep selected.
34. Continue on the other two layers,
Changing the percentage to 35% and 40%.
Selections - Select none.
Do NOT merge.
35. Save as 'snowflake.psp'
36. Open Animation Shop.
File - File - Open - snowflake.psp
View - Animation.
If you're satisfied, save as snowflake_sparkle.gif
Click next, next, next and finish.
Thank you for trying my tutorial.
'Season's Greetings'