Ok ...Let's get started...
1. Open your graphic. Duplicate twice.
Close the original. Minimize one copy .
2. Selection Tool - Ellipse - Feather 38.
Choose the focal portion of your graphic,
and draw the Ellipse around it.
Don't worry if it's not centered, we'll fix that in a minute.
Keep selected.
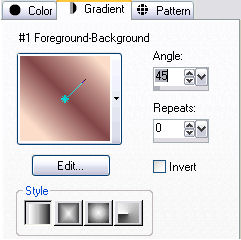
3. Foreground Color - Choose a very light color from your graphic.
Background color - Choose a darker color from your graphic.
Click on Gradient and choose the Foreground-Background Gradient.
See Settings below...
4. Now...If your graphic isn't centered, go to
Image - Canvas Size
Set both the width and height to the same number.
I used the largest dimension from my graphic.
This will square off your graphic.
You will have a transparent area around your graphic.
It won't be even, but this is ok, as we'll fix it momentarily...*S*...
Keep selected.
See illustration below...
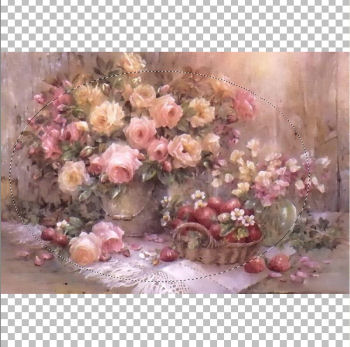
5. Selections - Invert.
New Raster Layer.
Floodfill with your gradient.
Selections - Select None.
You should have something like I have below...

6. At this point, we will crop our graphic,
so it will be relatively even all around.
Using your Selection Tool - Rectangle - Feathering 0.
Draw a rectangle around the area you wish to keep.
Image - Crop to Selection.
7. Be sure you are still on Layer 2.
Click in the center.
Selections - Invert.
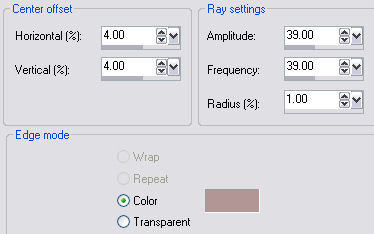
Effects - Distortion Effects - Spiky Halo.
See Settings below...
*NOTE* In your color box of the Spiky Halo Settings,
choose a soft color from your graphic.
8. Selections - Select none.
9. Image - Duplicate (Shift D)
Edit - Copy.
10. Back to main graphic.
11. Image - Add Borders - 2px - white.
Select with Magic Wand.
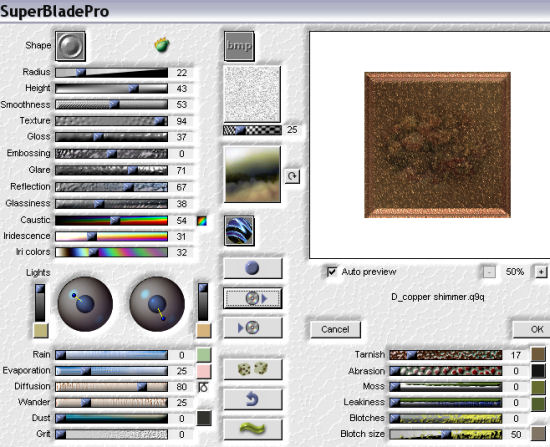
Effects - Plugins - Super blade Pro.
See Settings below...
12. Selections - Invert.
Effects - 3D Effects - Cutout.
See Settings below...
*NOTE*...Choose a deeper color from your graphic
for the Shadow color.
13. Repeat Cutout, but change the V and H to minus 10.
Selections - Select none.
14. Image - Add Borders - 6px - white.
Select and floodfill with your gradient.
Keep selected.
15. Effects - Plugins - Filters Unlimited - Sandflower Specials - Pool Shadow Framed.
Use Default settings.
16. Repeat Step 11 (The Super Blade Pro).
Selections - Select none.
17. Image - Add Borders - 20px - White.
Select with magic wand.
18. Edit - Paste into selection.
Your 'Edit-Copy' from Step 9 should still be in psp memory.
Selections - Select none.
19. Image - Add Borders - 40px - white.
Select with magic wand.
Repeat Step 18, but keep selected.
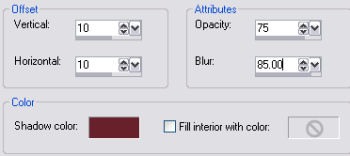
20. Effects - 3D Effects - Drop Shadow.
See Settings below...
*NOTE* - Choose a deeper color from your graphic, for the Shadow color.

Selections - Select None.
21. Image - Add Borders - 60px - white.
Select with Magic Wand.
22. Repeat Step 18, but keep selected.
23. Repeat Step 20, the Drop Shadow.
Selections - Select none.
24. Repeat Step 11.
Repeat Steps 14, 15 and 16.
25. Add some Decorative Corners.
26. Add your name or watermark.
Resize and save as a jpeg.
Thank you for trying my tutorial.