

Supplies Needed...
Paint Shop Pro - Version X
Goldfill
Gregs Factory Output - VolumnII - Pool Shadow
Graphic of your choice.
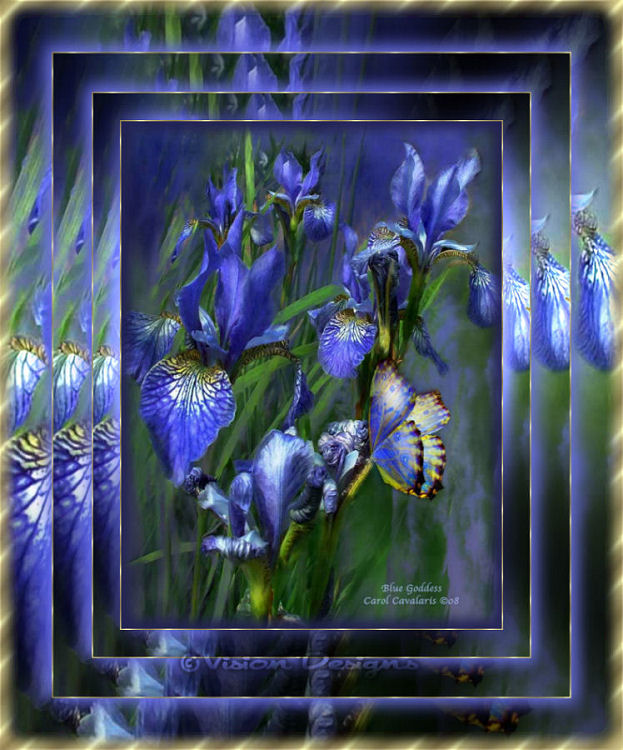
I am using this beautiful digital artwork, 'Blue Goddess' by Carol Cavalaris.
All work on her site is under copyright to Carol,
and you must obtain written permission from the artist to use her work.
Thank you Carol, for giving me permission
to use your beautiful floral art.
You may visit her site by clicking on the banner below.
Ok ...Let's get started...
1. Open your image. Duplicate twice.
Minimize one and close the original.
2. Optional...Depending upon your chosen graphic,
you may wish to select a portion to use for the framing.
If so, in your layer palette, right-click on the layer,
and promote background to layer.
Use your selection tool set to rectangle,
and select the portion that you wish to use.
Edit - Copy
Selections - Select none.
3. Image - Add borders.
Color - white.
Symmetric - checked.
Size 2 px.
Open the materials palette, set to pattern and scroll for the goldfill.
Select the white border with your magic wand,
and floodfill with the goldfill.
4. Selections invert.
Effects - 3D Effects - Cutout.
See settings below...
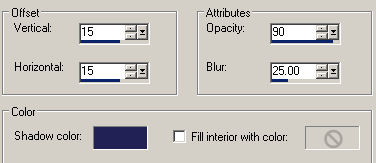
*Note*...Choose a dark color from your graphic for the shadow color.
The settings will all depend upon your chosen graphic.
Adjust as you feel necessary.
Repeat the cutout , but change the V and H to minus 15.
Selections - Select none.
5. Image - Add Borders - 45 px.
Select with magic wand.
6. Edit - Paste into selection.
Your Edit-Copy from Step 2, should still be in psp's memory.
Keep selected.
7. Effects - Plugins - Gregs Factory Output - VolumnII - Pool Shadow
Use default settings.
8. Selections - Invert.
This time, choose a softer, lighter color from your graphic.
Effects - 3D Effects - Drop Shadow
See settings below...
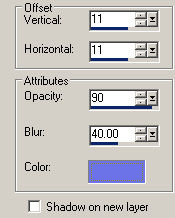
Repeat the drop shadow, but change the V and H to minus 11.
Selections - Select none.
9. Repeat Step 3 - The gold edge.
Selections - Select none.
10. Image - Add borders - 65px, white.
Select with magic wand.
11. Repeat Step 6.
12. Repeat Step 7 - The Pool Shadow.
Selections Invert.
13. Repeat Step 8 - The Drop Shadow.
Same settings as before...
Selections - Select none.
14. Repeat Step 3 - The gold edge.
Selections - Select none.
15. Image add borders 85px, white.
16. Repeat Step 6, 7 and 8.
17.Image - Add borders - 2px - white.
With magic wand, feather set to 42, select the border.
You will notice that because of the feathering,
you'll select more than just the small border.
Floodfill with the goldfill by
Tapping the selected border until you get the desired color.
(about 8 to 10 times)
Selections - Select none.
18. Add your name or watermark. Resize, and save as jpeg.
'Hope you've enjoyed doing this tutorial.'
Below is another one that I created.


Dianne McFarlane
E-Mail: sdmcfarlane@nf.sympatico.ca
|