
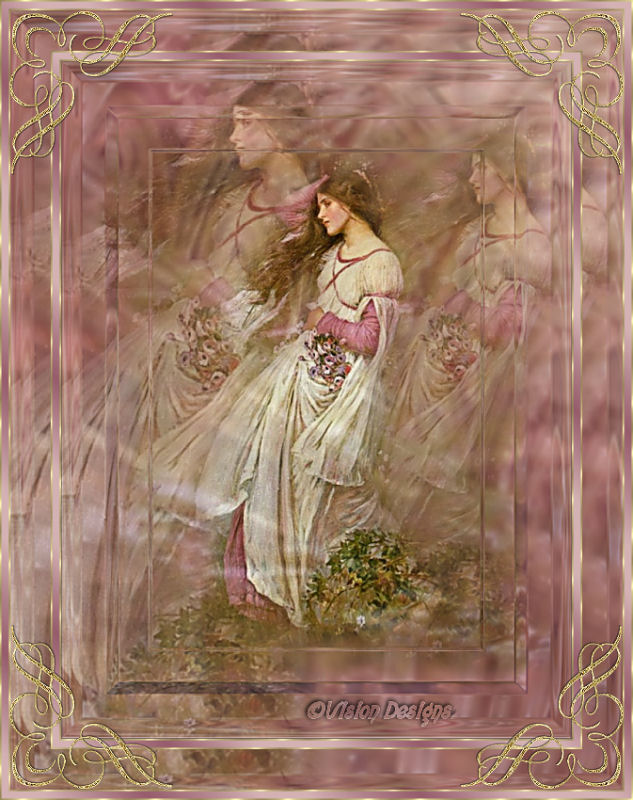

Supplies Needed...
Paint Shop Pro - Version X
A graphic of your choice.
Decorative Corners of your choice.
Goldfill
Plugins...
Alien Skin Eye Candy 5: Impact-glass.
Alien Skin Xenofex 2 - Shatter
My windflower texture 'here'
Just unzip the texture and put it in your textures folder in psp.

Ok, Let's get started.
1.Open your graphic.
Duplicate twice and close the original.
Note the dimensions of your graphic, and minimize for the moment.
2. Choose two colors from your graphic
for the foreground and background colors.
3. Click on the materials box,
Gradient,
Choose the Foreground/Background Gradient.
Linear - Angle 45 - Repeats 0 - Invert Box-checked.
4. Open a new transparent image,
200px larger than your graphic in both width and height.
Floodfill with your gradient.
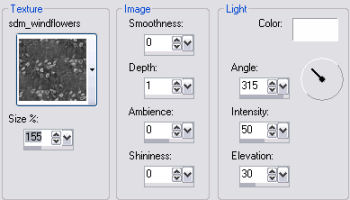
Effects - Texture Effects - Choose the sdm_windflowers texture.
See Settings below...
5. Activate your graphic.
Edit - Copy.
6. Back to your main working area image,
Edit - Paste as a new layer.
Image - Resize 85%.
Resize all layers - unticked.
Reduce the opacity of this layer to 44.
7. Layers - Merge visible.
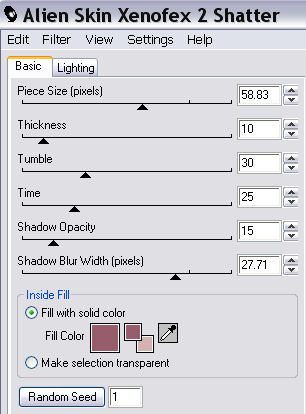
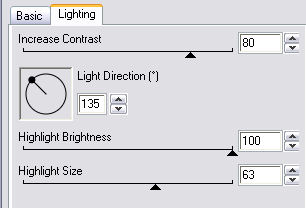
8. Effects - Plugins - Alein Skin Xenofex 2 - Shatter.
See Settings below...
9. Adjust Blur - Gaussian Blur - Radius 7.
10. Effects - Distortion Effects - Wind.
See Settings below...

Repeat setting, but change the direction to'from right'.
11.Activate your graphic again, we are going to feather the edges slightly.
Selection Tool - Rectangle - Feather 30.
Select a portion of your graphic.
Edit - Copy.
12. Activate your main graphic.
Edit - Paste as a new layer.
Lower the opacity of this layer to 12.
Change the Blend Mode to Screen.
Repeat the Wind Effect. (Step 10)
Layers - Merge visible.
13. Activate your graphic once more.
We're going to mist a portion of it.
Selection Tool - Freehand Selection.
Feather - 38.
Draw closely around the focal point of your graphic.
*Note* Stay very close to your chosen area, as the feathering is large.
You may need to adjust the feathering to suit your graphic.
14. Edit - Copy.
15. Activate your main graphic.
Edit - Paste as a new layer.
16. Duplicate this layer.
17. Working on the copied layer,
Image - Resize - 120%. Resize all layers - unticked.
Reduce the opacity of this layer to 42.
Move slightly up, and to the left. See finished result.
Move this layer below layer 1.
18. Activate raster Layer 1 again.
Right click and Duplicate.
Image - Resize - 115%. Resize all layers unticked.
Reduce the opacity of this layer to 34.
Move slightly to the right.
Move this layer below layer 1.
19. Layers - Merge Visible.
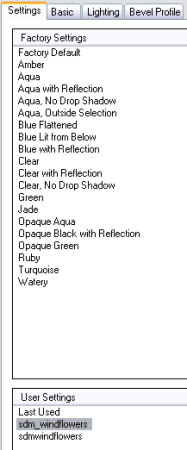
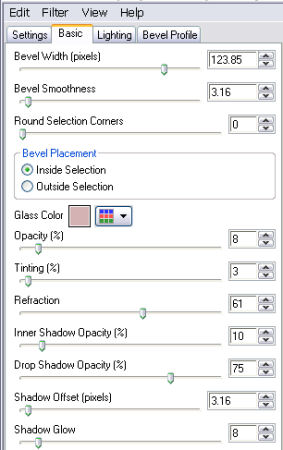
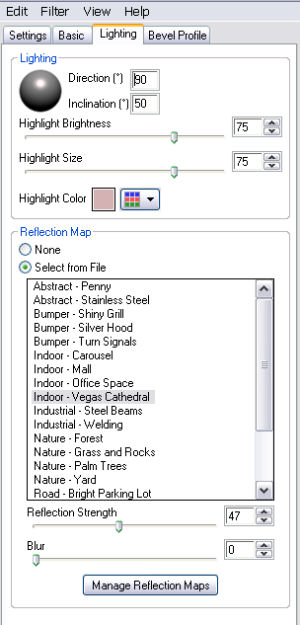
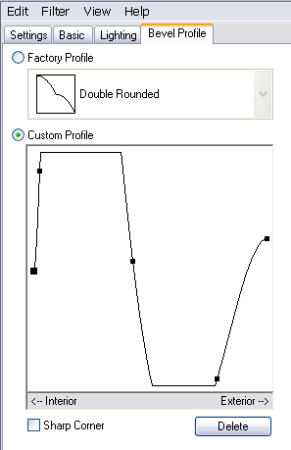
20. Effects - Plugins - Eye Candy 5:Impact - Glass
See settings below...
*note*...I have included all of my settings, which I've saved as sdm_windflowers.
My suggestion is to copy all of the settings, as I am showing below, and then save it.
With the Bevel Profile, you'll have to try to copy mine, as there are no numbers.
21. Adjust - Sharpness - Unsharp Mask.
See settings below...

22. Adjust - Sharpness - High Pass Sharpen.
See settings below...
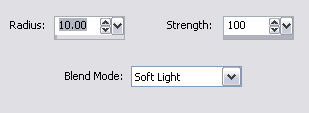
23. Edit - Copy.
24. Image - Add Borders - 2px - white.
Select and floodfill with goldfill.
Selections - Select none.
25. Image - Add Borders - 10px - white.
Select and floodfill with with your gradient.
Use the same settings, as in Step 3, but change the repeats to 4.
Selections - Select none.
26. Repeat Step 24.
27.
Image - Add Borders - 55px - white.
Select.
Edit - Paste into selection. Your copy from Step 23 should still be in psp memory.
Selections - Select none.
28. Repeat Steps 24, 25, and 26.
29. Add some decorative corners.
30. Add your name or watermark.
Resize and save as a jpeg.
Thank you for trying my tutorial.
I hope you like your results.

Below is the beautiful frame created by my friend Shabie Bird.
Thank you Shabie.
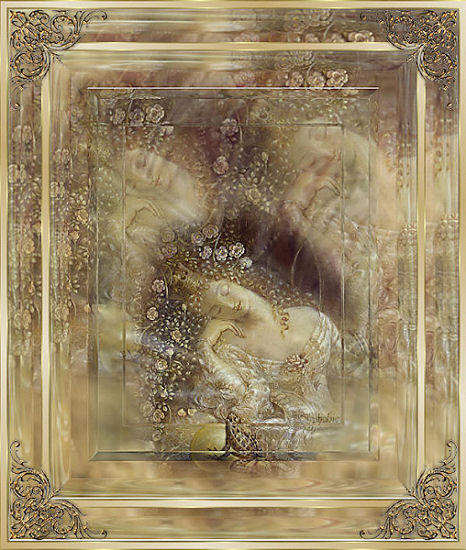

Another lovely creation, below, by my friend Rosalie.
Thank you Rosalie.





Dianne McFarlane
E-Mail: sdmcfarlane@nf.sympatico.ca
©Vision Designs
|