
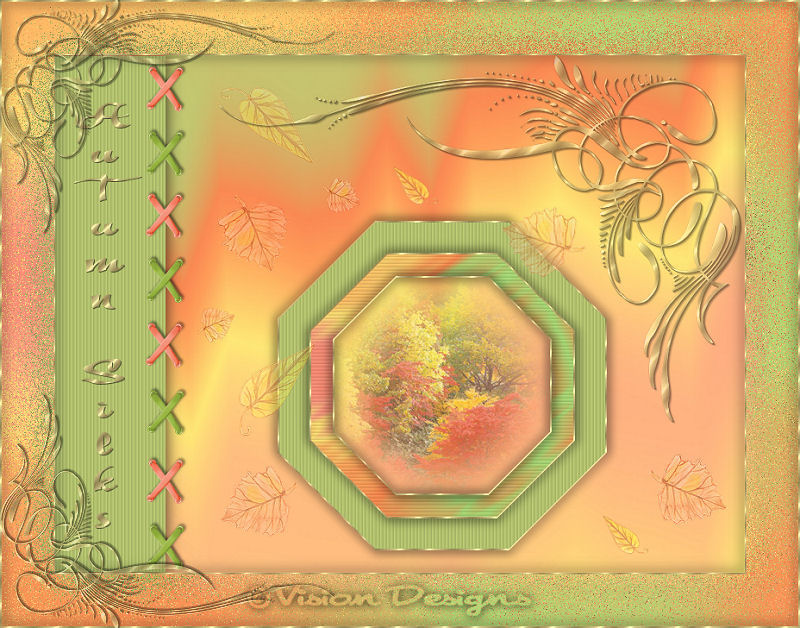

This tutorial has been created by
Vision Designs
for
Mangels Designs

Supplies Needed...
Paint Shop Pro - Version 10,
but should work with other versions, as well.
Mangels Designs - Silk Papers from the Deluxe Printing Papers
Silks 10 Collection
silk10-2
silk10-7
silk10-9
Mangels Designs - Corners from the Photo Corners Collection
Corner 33
Mangels Designs - From the Watercolor Kits
Seasonal - 3-fall Collection
Seasons Maple Leaf
Seasons Yellow Leaf
Mangels Designs - Digi Scrap Elements
Ribbons Collection
ribbon 24
Goldfill
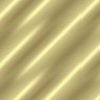
You may R-click on the swatch below, and save it to your harddrive.
Put it in your Patterns Folder in psp.
I always work in Layers - this gives you the opportunity
to change things, delete things, or move things around,
as you proceed with your design.
Ok, Let's get started...
Remember to save often.
1. Open the Mangels Designs - silks10-2, 7, and 9.
Image - Duplicate. Close the originals.
Resize as follows...
silk10-2---10%
silk10-7---22%
silk10-9---10%
Set aside for the moment.
Open the ribbon 24. Image - Duplicate. Close the original.
Image - Resize - 5%. We need it to be small.
Press Shift D to duplicate the ribbon.
On one of the ribbons - Adjust - Hue and Saturation - Colorize
Hue - 53
Saturation - 217
On the other, colorize
Hue - 53
Saturation - 121
2. Open a new transparent image - 800 x 600px.
Floodfill with the resized silk 10-7.
Angle - 0
Scale - 85
There will be a bar or line on the right side, but this is ok.
With your Selection Tool - Rectangle - Feather - 0.
Select the area of the bar.
New Raster layer.
Floodfill this layer with the silk 10-2.
Keep selected.
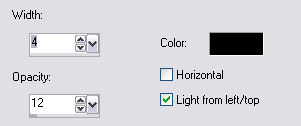
Effects - Texture Effects - Blinds.
See settings below...
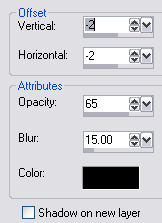
Effects - 3D Effects - Drop Shadow.
See settings below...
Selections - Select none.
3. Layers - Merge Visible.
Image - Mirror.
Image - Flip.
Add some text to the green bar.
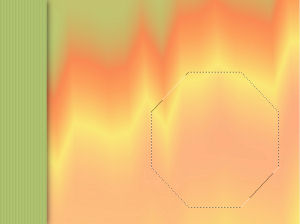
4.Selection Tool - Octagon.
Draw an octagon shape to cover much of the lower right area.
See Screenshot below...
Keep selected.
5. New Raster Layer.
Floodfill with the Goldfill.
Selections - Modify - Contract by 2.
Hit your Delete key.
Keep selected.
6. New Raster Layer.
Floodfill with the silk 10-2.
Effects - Texture Effects - Blinds.
Same settings as before.
Selections - Modify - Contract by 35.
Hit your Delete key.
Keep selected.
7. Repeat Step 5 - The goldfill.
8. New Raster Layer.
Floodfill with the silk 10-9.
Effects - Texture Effects - Blinds.
Same settings, except this time TICK the horizontal box.
Selections - Modify - Contract by 25.
Hit your Delete key.
Keep selected.
9. Repeat Step 5 - The goldfill.
Selections - Select none.
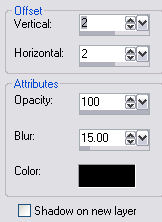
10. Apply a Drop Shadow on Layers 1, 3, and 5.
Do each layer one at a time, and repeat the drop Shadow,
except change the V and H to minus 2.
See settings below...
11. Close off Layer 1, the Merged layer,
by clicking on the little eye in the layer palette.
Layers - Merge - Visible.
Rename this newly Merged Layer - Frame.
Rename by right-clicking on the newly merged layer in the Layer Palette - Rename.
Type in 'Frame'.
This way you'll know which one it is, and will be able
to move it around to suit your particular needs.
12. Open the two resized and colorized Mangels Desigs - ribbon 24.
On the Orange one...
Edit - Copy.
Activate your working image.
Edit - Paste - as a new layer.
Effects - 3D Effects - Drop Shadow.
See settings below...
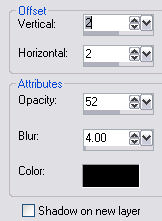
Image - Free Rotate - Left - 90.
All layers - UNTICKED.
Repeat this procedure on the green ribbon.
13. In the layer palette...
Right-click on layer 6 - the orange ribbon.
Duplicate.
Place the ribbon as you see in my final.
Repeat this procedure on layer 7 - the green ribbon.
Continue duplicating, until you have the space filled, as you see in my final.
14. Close off all the layers except for the ribbon layers
and the copies of the ribbon layers,
by clicking on the little eye in the layer palette.
Be certain that one of the ribbon layers is highlighted...
Layers - Merge Visible.
Turn the other layers back on,
by clicking on the little eye.
15. Open the two leaves from the
Mangels Designs - Watercolor Kits - Seasons 3-fall.
Image - Duplicate, and close the originals.
On both leaves - Image - Resize - 10%.
Taking each leaf in turn...
Edit - Copy.
Activate your working image.
Edit - Paste as a new layer.
Do this several times with the leaves,
and place them randomly over the background silk.
Free Rotate them in different positions.
All layers - UNTICKED.
Don't forget to Sharpen them after you do your rotating.
You may also resize them to different sizes.
All Layers - UNTICKED.
Reduce the opacity of each leaf layer to your liking.
We don't want them to be too bold.
See my final for placement of the leaves.
16. Open the Mangels Designs Corner 33.
Windows - Duplicate. Close the original.
Resize to 85%.
I decided to change the color of mine to a more golden tone.
Open your goldfill in the materials palette.
Selections - Select all.
Selections - Float.
Selections - Defloat.
New Raster Layer.
Increase the viewing size, and begin floodfilling
the selected areas, by clicking in the centers of all the selections.
Once filled - Selections - Select none.
Reduce the opacity of this layer to 62.
This will allow the nice markings to peep through.
Layers - Merge visible.
Edit - Copy.
Activate your working image.
Edit - Paste - As a new layer.
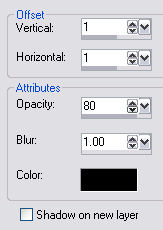
Effects - 3D Effects - Drop Shadow.
See settings below...
17. Open your favorite photograph.
Resize it so it is only slightly larger than the frame.
Selection Tool - Circle - Feather 48.
Draw a circle on the portion that you wish to use.
*NOTE* You may have to do and undo this a few times to get
it just right, as the feathering is large.
Edit - Copy.
Activate your working image.
Click on the frame layer.
Edit - Paste as a new layer.
Resize if necessary.
Move this layer below the frame layer.
18. When satisfied with the placing of everything,
Layers - Merge - All flattened.
19. Image - Add borders - 2px - white.
Select with magic wand.
Floodfill with the goldfill.
Effects - 3D effects - Drop Shadow.
Same settings as we used in Step 10, except change the opacity to 85.
Selections - Select none.
20. Image - Add borders - 60px - white.
Select with magic wand.
Open the resized copy of silks 10-9.
Edit - Copy.
Activate your working image.
Edit - Paste - Into selection.
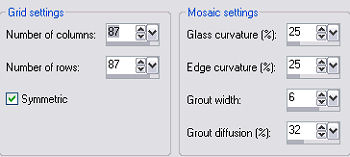
Effects - Texture Effects - Mosaic glass.
See settings below...
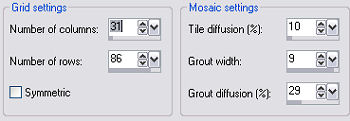
Effects - Texture Effects - Mosaic Antique.
See settings below...
21. Repeat Step 19 - The goldfill, plus the drop shadow.
22. Open the corner 33, once again.
Edit - Copy.
Edit - Paste as a new layer on your working image.
Image resize...choose a percentage that will suit your image.
I resized to 47%.
Image - Mirror.
See my final for placement, on the upper left corner.
In the layer palette, right-click on this layer.
Duplicate.
Image - Flip.
Layers - Merge - all flattened.
Thank you for trying my tutorial.
I hope you're pleased with your results.
'Happy Autumn'


Dianne McFarlane
E-Mail: sdmcfarlane@nf.sympatico.ca
©Vision Designs
|