
This tutorial has been created by
Vision Designs
for
Mangels Designs
Supplies Needed...
Paint Shop Pro - Version 10,
but should work with other versions, as well.
Supplies from Butterflies World One.
I used the following...
Butterflies World 1_frame5
Butterflies World 1_back1
Butterflies World 1_back2
Butterflies World 1_back7
Butterflies World 1_border1
Butterflies World 1_Butterflies and Flowers of your choice.
Plugins...
Gregs Factory Output - Vol II - Pool Shadow
Brushstrokes
Goldfill
You may R-click on the swatch below, and save it to your harddrive.
Mask 137 - This is a psp10 mask, but I have included it below, for those who may not have it.
Just unzip, and place it in your Mask Folder
You may download the mask
'here'
I always work in Layers - this gives you the opportunity
to change things, delete things, or move things around,
as you proceed with your design.
I will be referring to the Butterflies World 1, as bw1,
for the remainder of the tutorial.
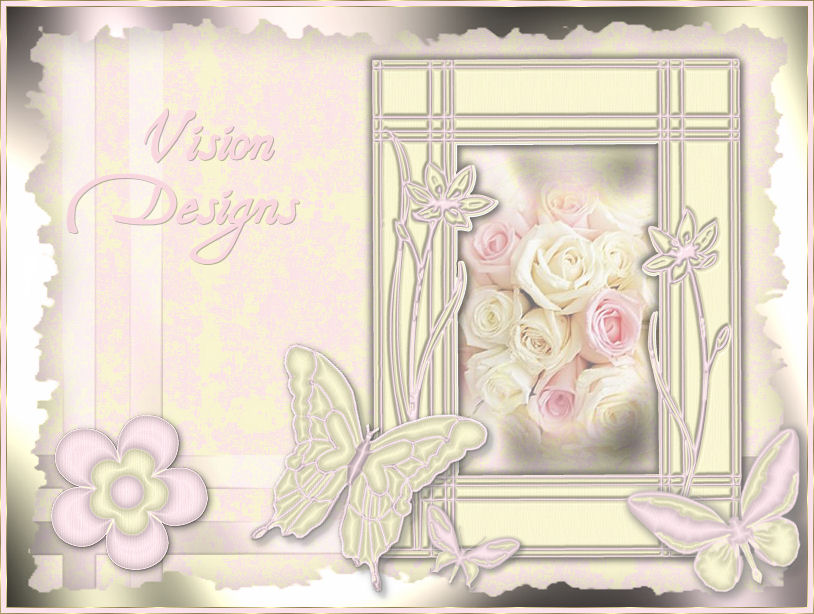
Ok, Let's get started...
Remember to save often.
1. Open bw1_backs 1, 2, and 7.
Resize all paper backs to 10%.
Image - Resize - 10%
Minimize in your workspace in psp.
2. Open up a new transparent image, 800x600px.
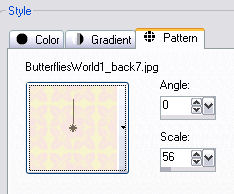
Floodfill this Layer with the bw1_back7.
See Settings below...
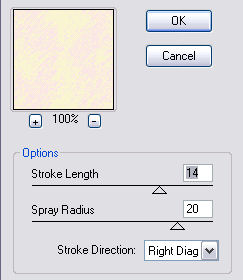
3. Effects - Plugins - Brushstrokes
See settings below...
4. Set your materials palette as follows...
Foreground color - #fee8eb (the pink from bw1_back1)
Background color - #f9f3cf ( the yellow from bw1_back2)
Click on Gradient, and choose the foreground-background gradient.
It should be the Number-One Gradient in your gradient box.
Angle - 45, Repeats - 0, Style - Linear.
New Raster Layer.
Floodfill with the Gradient.
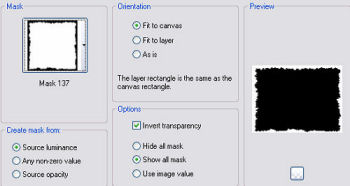
5. Layers - Load/Save mask - Load mask from disk.
Choose the Mask137.
See Settings below...
Layers - Merge Group.
Effects - Plugins - Gregs Factory Output-Vol II - Pool Shadow.
Use Default Settings.
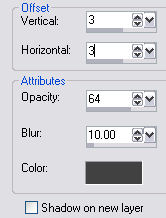
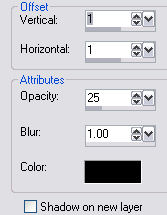
Effects - 3D effects - Drop Shadow.
See Settings below...

6. Open the bw1_frame5
Resize to 370x500px.
Edit - Copy.
7. Make your working image active.
Edit - Paste as a new layer.
Position as you see in my final result.
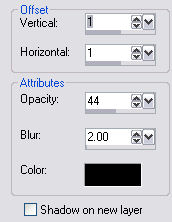
8. Effects - 3D Effects - Drop Shadow.
See Settings below...
9. Repeat Drop Shadow, using the same settings,
but change the V and H to minus 3.
10. Open up the bw1_border1.
Image - Resize to 800x800px.
Edit - Copy.
11.Back to working image.
Edit - Paste as a new layer.
In your Layers Palette, move this layer below thw Mask Layer.
Reduce the opacity of this layer to 42,
and apply the Gregs Factory output - Vol II - Pool Shadow.
Use the Default Settings.
12. At this point you may add your favorite photo, I used roses in mine.
Resize your photo, so it is just slightly smaller
than the outside edges of the frame.
Edit - Copy.
Activate your working image.
Edit - Paste as a new layer.
Move your photo layer, just below the frame layer.
*NOTE* You may have to erase a little,
so there are no edges showing beyond the frame edges.
Just click on the eraser tool, and set it to the sizing to suit your image.
Make sure that you're on the photo layer, when you erase.
13. Look in bw1_butterflies1 and bw1_flowers1,
and choose your favorite Butterflies and Flowers.
Resize them by 25%.
Individually highlight each one,
Edit - Copy.
Edit - Paste as a new layer on to your working image.
You may also resize them again, to different sizes, as I have done.
When you resize, be sure that 'Resize-all layers' is unticked.
Don't forget th 'Sharpen' your image after you resize.
*NOTE* You may also 'Rotate' them in different positions,
as I have done. See my final result.
Image - Free Rotate, either left or right, and position accordingly.
Don't forget the UNTICK 'all layers'.
Add a Drop Shadow to each element as you apply it.
See Settings below...
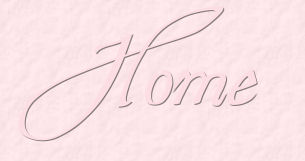
14. You may now add your favorite text or quotation,
placing it where I have placed my 'Vision Designs' text.
Click on the text tool, and choose your favorite font.
See settings below...


If you set the stroke to a number, then you must have colors
in both the foreground and background boxes, as shown in red boxed areas above.
If you prefer to have the stroke set at 0,
then you only need color in the background, or the lower box.
I always create my text in a vector box,
as it allows me to change the size, should I wish.
When satisfied, convert to raster layer.
*NOTE* If you've used a lengthy text, or quotation,
you may have to move your butterflies and flowers a little.
This is easy as we still have everything in layers.
You can simply move anything up or down in the layer palette,
or just move it out of the way in your workspace by
clicking on the image and using the mover tool to drag it around.
Effects - 3D effects - Dropshadow.
See settings below...
15. When you're satisfied with the position of everything...
Layers - Merge - All flattened.
16.We're going to add a small border to set things off nicely.
17. Image - Add borders - 1px - choose a color that is not in your image.
Select with the magic wand.
Floodfill with the goldfill.
Selections - Select none.
18. Image - Add borders - 10px - white.
Select with the magic wand.
Floodfill with one of the bw1_back 1 or 2.
I chose to use the pink one.
Selections - Select none.
19. Repeat Step 17.
Your layout is completed, I hope you enjoyed my tutorial.


Dianne McFarlane
E-Mail: sdmcfarlane@nf.sympatico.ca
©Vision Designs
|