
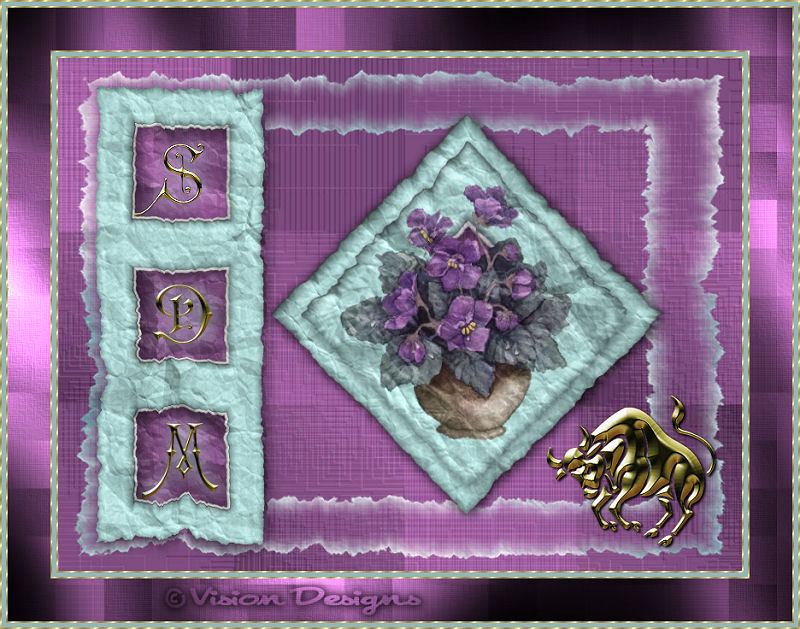

This tutorial has been created by
Vision Designs
for
Mangels Designs
Supplies Needed...
Paint Shop Pro - Version 10,
but should work with other versions, as well.
Mangels Designs - Deluxe Print Scrapbooking Papers
Tartan Papers Collection
Tartan 1 - Scott 1-2
Silk Papers Collection
Silk 1-6
Mangels Designs - Digital Scrapbooking Co-ordinated Sets
Set 13 Collection
frame 2
frame 7
Mangels Designs - Golden Names and Monograms
Monograms Collection
Choose the one that you prefer,
I am using monogram 7.
Mangels Designs - Golden Ornaments and Embellishments
Zodiac Collection
Taurus
Again , you may choose your own zodiac sign.
Plugins
Alien Skin - Xenofex 2 - Crumple
Gregs Factory Output - Vol II - Pool Shadow
Mask - ww-edgemask1
If anyone knows who made this mask,
please let me know, so that I may give them credit.
Just unzip, and place the mask in your Masks folder in psp.
You may download the mask
'here'
Goldfill
You may R-click on the swatch above, and save it to your harddrive.
Put it in your Patterns Folder in psp.
I always work in Layers - this gives you the opportunity
to change things, delete things, or move things around,
as you proceed with your design.
Ok, Let's get started...
Remember to save often.
Open the Silk 1-6. Image - Duplicate. Close the original.
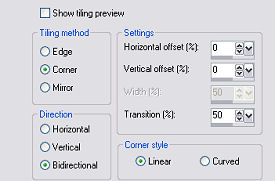
Effects - Image Effects - Seamless Tiling.
See settings below...
Set aside for the moment.
Open the scott 1-2 paper. Image - Duplicate. Close the original.
Place this in the foreground materials box.
angle 0
Scale 90
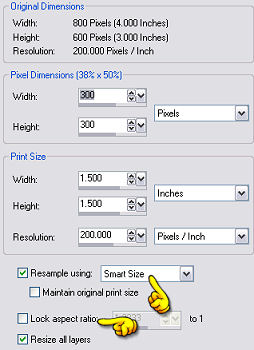
1. Open a new transparent image - 800 x 600px.
Floodfill with the scott 1-2.
2. New raster Layer.
Floodfill with the seamless silk 1-6.
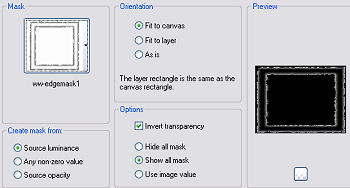
Layers - Load/Save Mask - Load mask from disk.
Choose the ww-edgemask1.
See Settings below...
Layers - Merge Group.
Still on the mask layer,
Adjust - Hue and Saturation - Colorize.
Hue - 126
Saturation - 85
3. Open the frame 2 - Duplicate - Close the original.
We want to remove the grey outer part of the frame.
Choose your selection tool - Rectangle.
Select the portion just inside the grey outer frame.
Image - Crop to selection.
Image - Resize - 550 x 412.
Edit - Copy
Activate your working image.
Edit - Paste as a new layer.
Image - Free rotate - Right - 90%.
All layers - UNTICKED.
Adjust - Sharpness - Sharpen.
Move into place as you see in my final.
Effects - 3D Effects - Drop Shadow.
See settings below...

4. With your selection tool - Rectangle - Feather 0.
Select an area around your newly placed frame.
Selections - Modify - Contract by 8.
We don't want any peeking out from behind the frame.
New Raster Layer.
Floodfill with the scot1-2.
Angle - 0
Scale - 25
Selections - Select none.
Move this layer below the frame layer.
5. Open frame7. Duplicate. Close the original.
Image resize to 300 x 300.
See settings below...
Edit - Copy.
Activate your working image.
Edit - Paste as a new layer.
Image - Free Rotate - Right - 45 degrees.
All layers - UNTICKED.
Adjust - Sharpness - Sharpen.
Repeat the drop shadow from Step 3.
Move into position as you see in my final.
6. Still on the frame layer,
in the layer palette, Right-click on this frame layer - Duplicate.
Image - Resize - 120%.
Resize all layers - UNTICKED.
Move this layer below the first frame 7 layer.
Add a drop shadow, same as in Step 3.
Be certain that the two frames are sitting evenly.
7. Open the 'Monograms' that you have chosen.
I'm using my initials...*S*...
Depending upon the monogram that you have chosen,
you will have to resize it accordingly.
On each resized monogram...
Edit - Copy.
Activate your working image.
Edit - Paste as a new layer.
*Note* - Make certain that the pasted monograms layers
are below the triple frame layer.
and on top of the floodfilled rectangle that we made in Step 3.
8. You may now add your photograph.
Resize it to fit our frame from Step 5.
Edit - Copy.
Activate your working image.
Edit - Paste as a new layer.
Move this layer below the frame layer.
Optional, you may also choose
to float it on top of the frame as I have.
9. Open your chosen 'Zodiac' sign.
Resize to suit your needs.
I resized mine to 55%.
Edit - Copy.
Activate your working image.
Paste as a new layer.
Move to the bottom right, as you see in my final.
10. *Optional* If you wish to apply an effect to some of the layers,
Check out the following...
In the layer palette, click on the following layers,
one at a time,
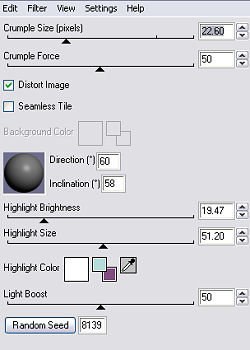
and apply the plugin - Crumple.
...the mask layer
...the triple frame layer
...the single frame layers
...the background layer that we made in Step 4
Effects - Plugins - Alien Skin - Xenofex2 - Crumple.
See settings below...
You may choose to do only a portion of the above layers.
See my 'sample' below.
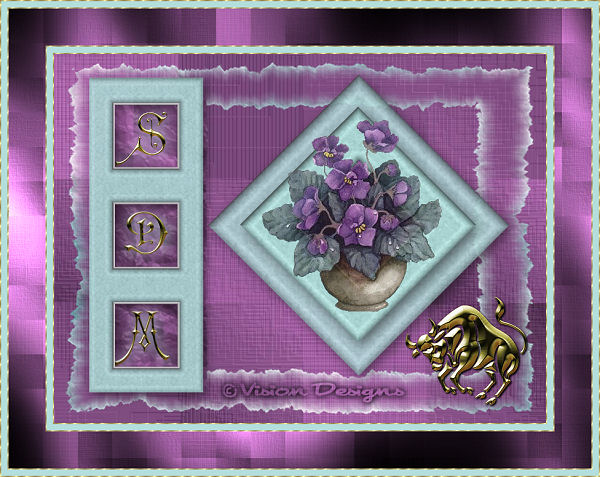
11. When satisfied with how everything looks,
Layers - Merge - All flattened.
12. Image - Add borders - 2px - white.
Select with magic wand.
Floodfill with the goldfill.
Selections - Select none.
13. Image - Add borders - 10px - white.
Select with magic wand.
Floodfill with a color form your image.
I'm using #93b2b7.
Selections - Select none.
14. Repeat Step 12.
15. Image - Add borders - 60px - white.
Select with magic wand.
Floodfill with the scott1-2 paper.
Angle - 0
Scale - 25
Effects - Plugins - Gregs Factory Output - Vol II - Poolshadow.
Use default settings.
Repeat this effect one more time.
Selections - Select none.
16. Repeat Steps 12, 13, and 14.
We have finished.
Thank you for trying my tutorial.
I hope you like your results.
Below is another sample that I did
showing it without the 'Crumple' effect.


Dianne McFarlane
E-Mail: sdmcfarlane@nf.sympatico.ca
©Vision Designs
|