
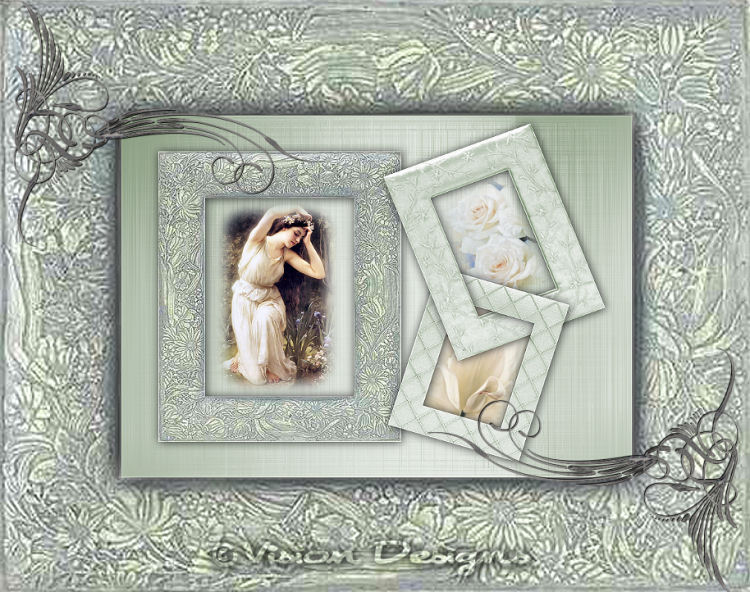

This tutorial has been created by
Vision Designs
for
Mangels Designs

Supplies Needed...
Paint Shop Pro - Version 10,
but should work with other versions, as well.
Mangels Designs - Deluxe Print Scrapbooking Papers
Golden and Silver Papers Collection
Silver 1-10
Mangels Designs - Printable Frames
From the Floral Frames Collection
mangels_milesdemarcos_floral23
From the Cloth and Spangles Collection
mangels_milesdemarcos_tyl13
From the Jewels Designs Collection
mangels_milesdemarcos_joyas15
Mangels Designs - Photo Corners Gallery
Corner 36
Plugins...
dbs - flux
I always work in Layers - this gives you the opportunity
to change things, delete things, or move things around,
as you proceed with your design.
Ok, Let's get started...
Remember to save often.
1. Open the three mangels-milesdemarcos-frames.
Image - Duplicate. Close the originals.
Minimize the floral23.
On each of the other two frames,
Adjust - Hue and Saturation - Colorize.
Hue - 73
Saturation - 35
Minimize in your workspace.
2. Open the Silver paper1-10.
Image - Duplicate. Close the original.
On your copy, colorize as you have done with the frames.
Selection Tool - Set to square.
Feather - 0
Select a square, from a nice portion of your silk.
Image - Crop to selection.
Minimize in your workspace.
3. Open a new transparent image - 800x600.
4. Open the floral23 frame.
Edit - Copy.
Activate your working image.
Edit - Paste as a new layer.
Image - Resize - 73%. Resize all layers - UNTICKED.
Adjust - Sharpness - Sharpen.
Move this frame to the left , as you see in my final.
5. Open the tyl13 frame.
Edit - Copy.
Activate your working image.
Edit - Paste as a new layer.
Image - Resize - 47%. Resize all layers - UNTICKED.
Adjust - Sharpness - Sharpen.
Move this frame to the upper right, as you see in my final.
Image - Free rotate - Left - 21 degrees.
All layers - UNTICKED.
Adjust - Sharpness - Sharpen.
6. Open the joyas15 frame.
Edit - Copy.
Activate your working image.
Edit - Paste as a new layer.
Image - Resize - 40%. Resize all layers - UNTICKED.
Adjust - Sharpness - Sharpen.
Move this frame to the bottom right, as you see in my final.
Image - Free rotate - Right - 17 degrees.
All layers - UNTICKED.
Adjust - Sharpness - Sharpen.
7. In the layer palette...
Right-click on Layer 3 - Duplicate.
Close this copy for now, by clicking on the little eye
to the left of the image in the layer palette.
Repeat the above procedure for Layer 4.
We are saving these for our drop shadow, later.
The reason for this is so the drop shadow will have something
to apply to properly,
as we're going to erase part of our frames.
8. We're now going to interlock our two smaller frames.
Advance the viewing to about 350%.
Click on the eraser tool.
See settings below...

Be certain that the joyas 15 frame is
highlighted in the layer palette.(Should be Layer 4)
Begin to carefully erase parts of the frame.
See below...
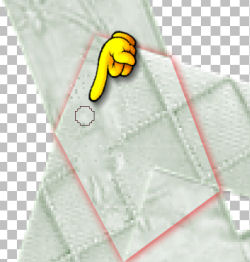
I have surrounded the area to be erased in red.
If you find it difficult to keep a nice clean edge,
just reduce the size of the eraser to one that you're comfortable with,
and keep erasing.
You may even drop the size down to 1, and erase 1px at a time.
I would increase the viewing even more to do that...
9. We are now going to apply our drop shadows.
Effects - 3D Effects - Drop Shadow.
See settings below...
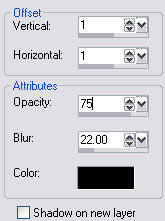
Click on layer 2 , the largest of the three frames.
Apply the drop shadow.
Turn the copy of layer 3 back on by clicking on the little eye.
Highlight this layer.
New raster Layer.
Apply the drop shadow.
Move this layer all the way to the top of your layer palette.
It is moved up, so that it will show up on the erased area,
otherwise, it will be hidden under layer 4.
Don't worry about shadows showing where they don't belong.
We will fix that later.
You may now delete the 'Copy of Layer 3'.
See below...
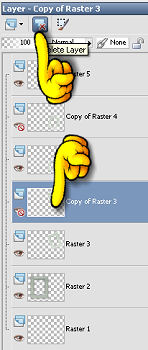
In layer palette, turn on 'Copy of layer 4'.
New raster layer.
Repeat the drop shadow.
Delete 'Copy of layer 4'.
10. We are going to erase some of the 'dropshadow' bits that we don't need.
Highlight layer 6, the drop shadow layer on the smaller lower right frame.
Carefully erase the bits as you see below...
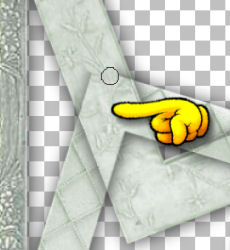
Highlight layer 5, the drop shadow layer on the larger upper right frame.
Carefully erase the bits as you see below...
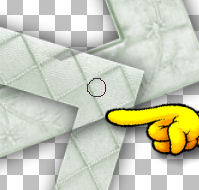
11. We will now add our photographs.
Don't worry if they don't quite fill the frames, we'll fix that later.
Choose your three favorite photographs.
For the larger frame - just resize, and mist if you like.
See my 'Misting' Tutorial below..

Edit - Copy.
In layer palette, click on the layer with the largest frame.
Edit - Paste as a new layer.
Resize again if necessary.
Move this layer below the frame layer.
For the upper right frame...
Highlight the frame layer ( should be layer 3)
Edit - Copy your resized and misted photograph.
Back to your working image.
Edit - Paste as a new layer.
Image - Free Rotate - Left - 25 degrees.
All layers - UNTICKED.
Move this layer below the frame layer.
For the lower right frame...
Highlight the frame layer ( should be layer 4)
Repeat the above procedure,
except change the rotation to
Right - 17 degrees.
Move this layer below the upper frame layer.( should be layer 3)
12. Close off layer 1.
Be certain that one of the other layers is highlighted.
Layers - Merge - Visible.
Turn Layer 1 back on.
13. With layer 1 highlighted,
place the colorized silk 1-10 in the patterns box of the materials palette.
Angle 0
Scale 55.
I didn't do a seamless tile here, as I thought
the sectioned background looked rather nice.
Floodfill layer1 with the colorized silk.
Effects - Plugins - dbs flux - blast.
See settings below...
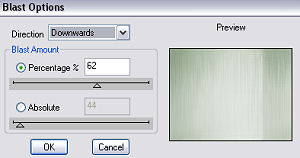
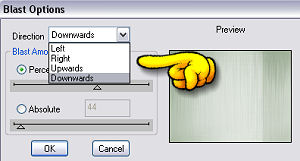
Repeat this effect three more times,
each time changing the direction.
See below...
14. Let's frame our image.
I have chosen the
mangels_milesdemarcos_floral23 frame.
Your sizing will totally depend upon your own image.
Just keep playing with the percentages, until you get things to fit nicely.
I resized mine to 123%.
Then Copy and Paste your working image as a new layer on the frame.
Add a drop shadow to the working image layer.
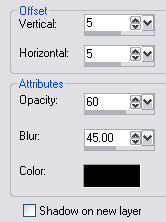
Repeat the Drop Shadow, but change the V and H to minus 5.
Layers - Merge - All Flattened.
15. Open the Corner 36.
Edit - Copy.
Activate your working image.
Edit - Paste as a new layer.
Image - Resize - 60%
Resize all layers - UNTICKED.
Effects - 3D Effects - Drop Shadow.
See settings below...
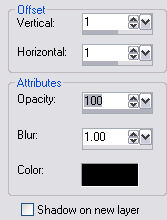
In layer palette, right click on the corner layer - Duplicate.
Image - Mirror.
Image - Flip.
Move into position as in my final.
Layers - Merge - all flattened.
We are all finished.
Thank you for trying my tutorial.
I hope you like your results.


Dianne McFarlane
E-Mail: sdmcfarlane@nf.sympatico.ca
©Vision Designs
|