
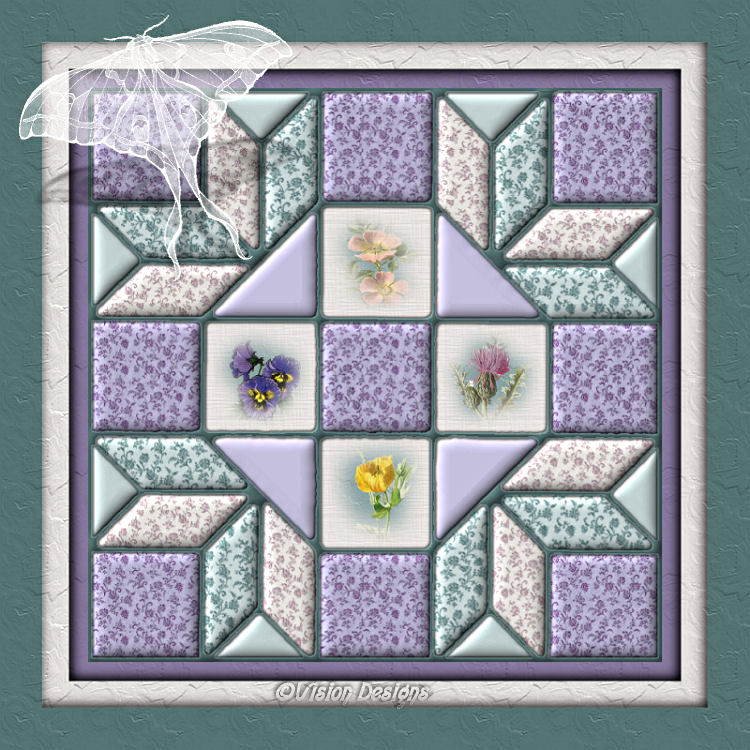

This tutorial has been created by
Vision Designs
for
Mangels Designs

Supplies Needed...
Paint Shop Pro - Version 10,
but should work with other versions, as well.
Mangels Designs - Floral Papers from the Printing Papers Collection
Floral2-2
Floral2-4
Floral2-6
Quiltlines Template.
For some reason, this template will show up as version 8,
I have saved it as compatible with version 9 or 10,
so when you unzip the file, open it accordingly.
If anyone knows where this template came from,
please let me know,
so that I may give them proper credit.
You may download the template
'here'
OR
for psp 9 compatible
'here'
I always work in Layers - this gives you the opportunity
to change things, delete things, or move things around,
as you proceed with your design.
Ok, Let's get started...
Remember to save often.
1. Open the Floral2-2, 4, and 6. Image - Duplicate. Close the originals.
Instead of resizing, using the selection tool, set to square, feather 0,
Select a portion of each of the florals.
Image - Crop to selection.
Minimize each in your workspace in psp.
Activate the floral2-4.
I decided to change
this color to blend a little nicer with my idea.
Adjust - Hue and saturation - Colorize.
Hue - 128
Saturation - 43
Minimize in your workspace in psp.
2. Open the quiltlines.
Edit - Copy.
3. Open a new transparent image - 750 x 750.
Edit - Paste as a new layer.
4. We are now going to Floodfill our patches with the three different floral2 papers.
In order to do this, each color will be done on it's own layer.
It is important to keep the lines on their own layer,
with no color on it.
5. In the layer palette, click on the 'lines' layer.
With your magic wand, tolerance 0,
hold down the shift key and click in the center of the shapes
you wish to fill.
Once you have selected the shapes for the first color,
Selections - Modify - Expand by 3.
Keep selected.
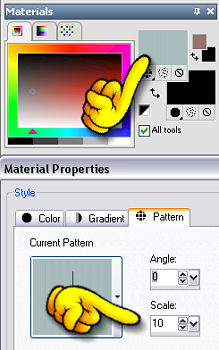
6. Place your first floral2 pattern in the Foreground Materials Box.
See settings below...
7. New raster Layer.
8. Begin floodfilling your chosen selections with your pattern.
Keep selected.
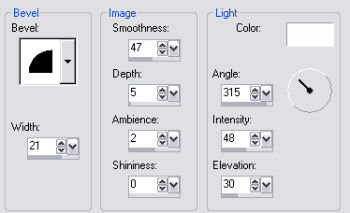
9. Effects - 3D Effects - Inner bevel.
See settings below...
10. Selections - Select none.
11. In the layer palette, highlight the 'lines' layer,
with the magic wand, holding down the shift key,
select the next set of shapes you wish to fill.
Selections - Modify - Expand by 3.
Keep selected.
12. In the Foreground Materials Pattern Box,
select your next pattern.
Same settings as before.
13. New Raster Layer.
Floodfill the selections with your next chosen pattern.
14. Repeat Steps 9 and 10.
15. You should have the idea of how to select and fill the shapes.
Repeat Steps 11, 12, 13, and 14, until all of the shapes are filled in.
*NOTE* I decided to use a solid color for some of my shapes.
See my final result.
My colors...
pale mauve - #c9c4e2
pale mint green - #c7d6d6
*PLUS* You'll see in my final, four of the shapes are not filled in.
We'll save those for our photographs.
16. We'll fill in the four 'photograph' squares,
with an off white, just to give it a background color.
I used #e9e5e2.
Follow the same procedure, steps 11 through 14,
except, omit the innerbevel.
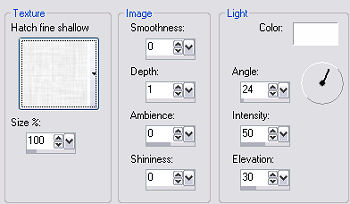
Instead, apply a light texture.
See settings below...
Selections - Select none.
17. Add your favorite photographs to the four off-white squares.
You will need relatively small photographs.
*NOTE* You will need to apply them one square at a time.
If you select all of the squares at once,
then the first photo will divide itself among all the selections.
18. Activate your photograph. Resize if necessary,
and have it ready for the working image.
You may mist if if you like.
See my 'Misting' Tutorial below...
19. In the layer palette, click on the lines layer.
With the magic wand, click in the center of one of the squares.
Keep selected.
Go back to the layer palette, and highlight
the layer with the off white textured squares.
New Raster layer.
20. Acitvate your photograph.
Edit - Copy.
Back to your working image.
Edit - Paste into Selection.
You may have to resize, if it is still too large.
If so, go to Image - Resize - use the %.
Don't forget to UNTICK Resize all layers.
Use the mover tool to position it to your liking.
Selections - Select none.
21. Repeat Steps 19 and 20, to fill the remaining three squares,
remember to do one at a time.
22. Now we want to work on the stitching lines between the patches.
In the layer palette, once again, click on the lines' layer.
Selections - Select all.
Selections - Float.
Selections - Defloat.
Selections - Modify - Contract by 1.
Keep selected.
23. New Raster Layer
Floodfill this layer with A complimentary color .
I used a green - #577676.
Keep selected.
24. Effects - 3D effects - Inner Bevel.
Same settings used in Step 9.
Effects - 3D effects - Drop Shadow.
See settings below...
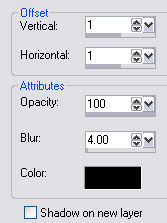
Repeat the Drop Shadow, but change the V and H to minus 1.
25. Move this layer all the way to the top in the layer palette.
The lines are a little irregular, but this gives our quilt a nice homemade look...*S*...
Optional - You may reduce the opacity of this layer a little.
I reduced mine to 81.
26. When satisfied, Layers - Merge - All flattened.
27. Almost finished - Let's add some borders.
Image - Add Borders - 25px - white.
Select with the Magic Wand.
Floodfill with color #88789f.(or your own choice)
Selections - Select none.
28. Image - Add Borders - 35px - white.
Select with the Magic Wand.
Floodfill with color #ebe7e4.(or your own choice)
Keep selected.
29. Effects c- 3D effects - Drop Shadow.
See settings below...
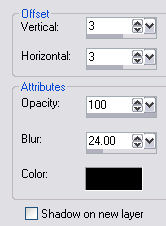
Repeat the drop shadow, but change the V and H to minus 3.
Selections - Select none.
30. Image - Add Borders - 55px - white.
Select with the Magic Wand.
Floodfill with color #567575.(or your own choice)
Keep selected.
Repeat Step 29 - The drop shadow.
Selections - Select none.
Optional - You may add a texture to your framing.
We have finished our 'quilt'.
Thank you for trying my tutorial.


Dianne McFarlane
E-Mail: sdmcfarlane@nf.sympatico.ca
©Vision Designs
|