
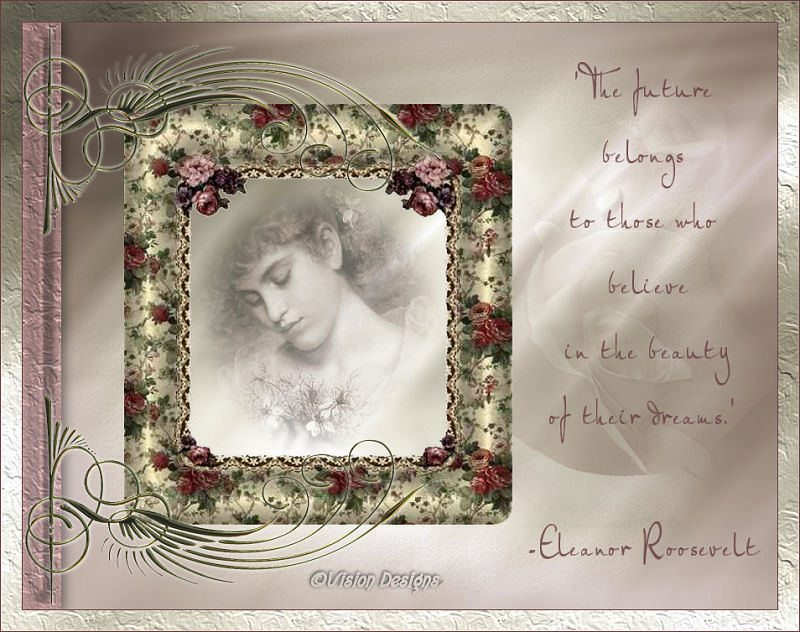

This tutorial has been created by
Vision Designs
for
Mangels Designs

Supplies Needed...
Paint Shop Pro - Version 10,
but should work with other versions, as well.
mangels_milesdemarcos_floral47 frame, from the 'Floral Frames' Collection
silk4-9, from the Silks Backgrounds
corner38, from The Photo Corners Collection
Plugins...
Eye Candy 3.1 - Inner Bevel
Mask - edge texture mask
If anyone knows who made this mask,
please let me know, so that I may give them credit.
SDM_Floral Texture - This is one of my own textures.
Just unzip, and place the mask in your Masks folder in psp,
and the SDM_Floraltexture in the Textures folder
You may download the supplies
'here'
I always work in Layers - this gives you the opportunity
to change things, delete things, or move things around,
as you proceed with your design.
Ok, Let's get started...
Remember to save often.
1. Open silk4-9. Image - Duplicate. Close the original.
Image - Resize - 28%
See settings below...
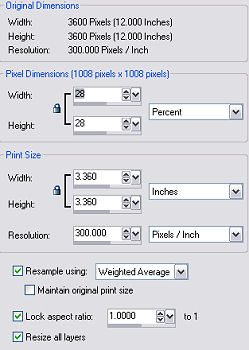
As the silk is not seamless, plus has a
lovely gradient effect on it, I have resized it to suit my needs.
I just kept resizing and floodfilling my working
image, until I no longer had any visible lines showing.
I will often do a seamless tile, but sometimes
with a gradient fill, they aren't as pretty as the original piece.
So, for the 900x700 image, I resized to 28%.
Minimize in your workspace in psp.
2. Open up mangels_demarcos_floral47 frame.
Image - Duplicate - Close the original.
This pretty frame has a thin white border around it,
and we'll need to remove it, so it doesn't show up on our page.
As it is on a transparent background, you can't see the thin border,
unless you put it on a dark background.
I found the easiest way to eliminate it is as follows...
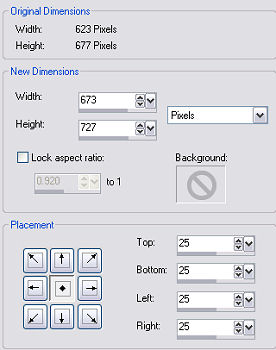
The transparent edge is very narrow, so first we'll fix that part.
Image - Canvas size
See settings below...
Using the Selection Tool, Tolerance 40.
Click on the transparent area around the frame.
You can see the triangular areas on the corners
where the marching ants aren't directly surrounding the frame...
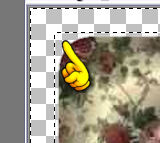
With your selection tool,
click in the center of this small area, to select it.
This should select all of the corners .
If not, just hold down the shift key, and select each one.
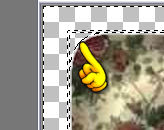
Selections - Modify - Expand by 2.
You will now see the marching ants close to the edge of the frame.
Hit your delete key, one or two times.
This will remove the white line.
Selections - Select None.
*NOTE*...Save your frame as a psp image.
This will make it available for the next time you wish to use it.
You should save it with a slightly different name
than the original, so you don't replace the original,
I saved mine as 'mangels_milesdemarcos_floral49_b.psp'.
Edit - Copy.
3. Open up a new transparent image - 900x700.
Floodfill with your resized silk4-9.
4. Right-click on the grey part at the top of your working image.
Edit - Paste as a new layer.
The copy from Step 2 will still be in psp's memory.
5. Image - Resize - 75%
Adjust - Sharpness - Sharpen.
Move slightly to the left, so that the areas
around the top, bottom and left side of the frame are almost equal.
6. Choose a pretty deep pink color from your frame.
I'm using #81595a.
New Raster Layer.
Floodfill with your chosen color.
Move this layer below the Frame layer.
7. Layers - Load/Saved mask - Load mask from disk.
Choose the Edge texture mask.
Layers - Merge - Merge group.
Reduce the opacity of this layer to 34.
8. New Raster Layer.
Choose a new pink toned color from your frame.
I'm using #bb9192.
Using the selection tool.
Set to Rectangle - Tolerance 0.
Draw a rectangle, approximately 50px wide and
the full length of your working image.
Keep selected.
Floodfill the rectangle with you newly chosen color.
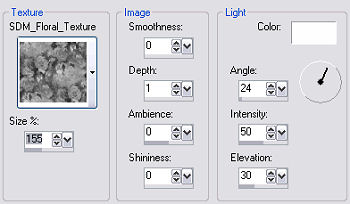
9. Effects - Texture effects - SDM_Floral_Texture.
See settings below...
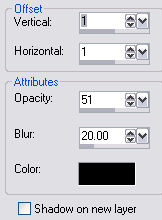
10. Effects - 3D effects - Drop Shadow.
See settings below...
11. Effects - Plugins - Eye candy 3.1 - Inner Bevel.
See settings below...
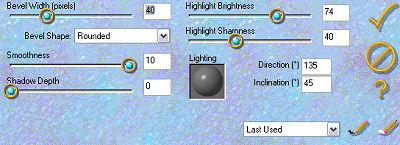
Reduce the opacity of this layer to 75.
12. Open up the corner38.
Duplicate, and close the original.
Resize - 50%.
Edit - Copy.
13. Activate your working image.
Edit - Paste as a new layer.
Move into place on the left side.
See my final for placement.
*Note*...You may have to move your frame just a little.
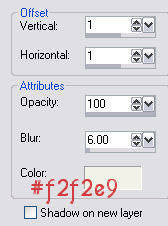
Effects - 3D effects - Dropshadow.
See settings below...
14. In the layer palette, R-click on the corner layer - Duplicate.
Image - Flip.
Move to upper corner, see my final.
15. At this point you may add your favorite photograph.
I'm using a beautiful painting titled
'Love in a Mist' by Sophie Anderson(1823-1903)
In the layer palette, click on the frame layer.
With the magic wand, click in the center of the frame.
Selections - Modify - Expand by 15.
Set aside for the moment.
Open your photograph, and resize if necessary.
Optional - Mist your photograph.
If you would like to 'mist'your photograph,
just click on 'Misting' below...

When ready, Edit - Copy
Activate your working image.
Edit - Paste - into selection.
Selections - Select none.
Optional - Reduce the opacity of this layer to 55.
Move this layer below the frame layer.
16. Add something pretty on the Right side.
I used some roses to keep with the theme in the frame.
Move this layer below the frame layer.
Reduce the opacity of this layer to 22.
17. Using the text tool, and your favorite font,
add your favorite quote.
We have finished our page.
Thank you for trying my tutorial.


Dianne McFarlane
E-Mail: sdmcfarlane@nf.sympatico.ca
©Vision Designs
|