
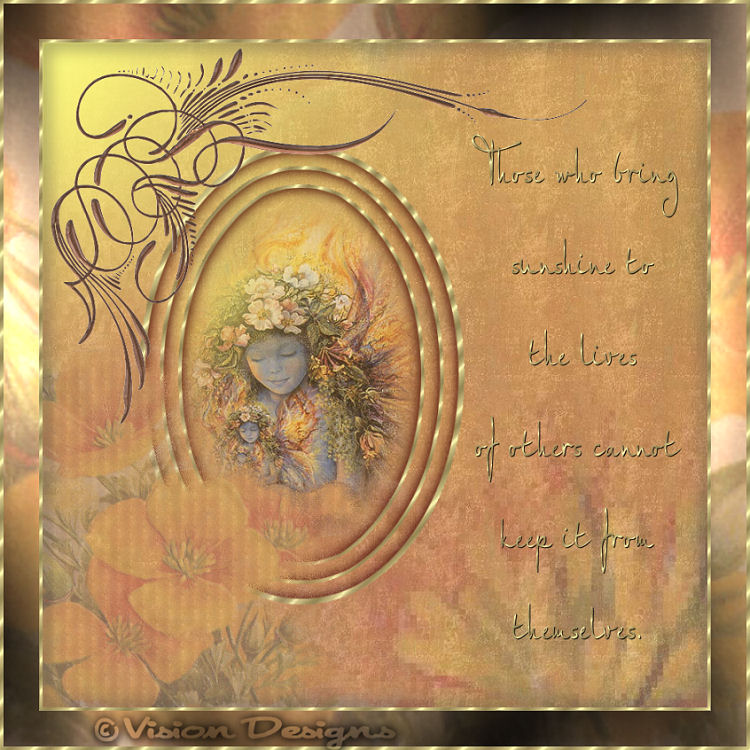
This tutorial has been created by
Vision Designs
for
Mangels Designs
Supplies Needed...
Paint Shop Pro - Version 10,
but should work with other versions, as well.
Mangels Designs - Floral Papers from the Printing Papers Collection
Floral 4-13
Mangels Designs - Corners from the Photo Corners Collection
Corner 33
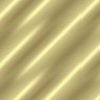
Goldfill
You may R-click on the swatch above, and save it to your harddrive.
Put it in your Patterns Folder in psp.
I always work in Layers - this gives you the opportunity
to change things, delete things, or move things around,
as you proceed with your design.
Ok, Let's get started...
Remember to save often.
1. Open the Mangels Designs - floral4-13.
Image - Duplicate. Close the original.
Do not resize.
Edit - Copy.
2. Open up a new transparent image, 750 x 750px.
Edit - Paste - as a new layer.
You will get just a portion of the original,
but great texture,
and I think makes a wonderful background.
3. Using the Selection Tool...
Ellipse
Feather - 0
Draw an ellipse to take up approximately half
of the working image.
See screenshot below...
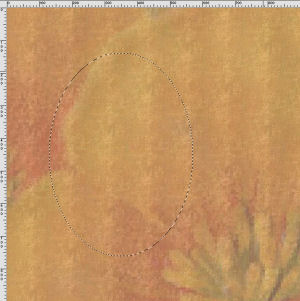
Keep Selected.
4. In the materials palette, set your pattern to the goldfill.
Angle - 0
Scale - 50.
New Raster Layer.
Floodfill the selected ellipse, with the goldfill.
Selections - Modify - Contract by 5.
Hit your delete key.
Keep selected.
5. New Raster Layer.
Effects - 3D Effects - Cutout.
See settings below...
Keep selected.
New Raster Layer.
Repeat the Cutout,
except change the V and H to minus 2.
Keep selected.
6. Selections - Modify - Contract by 20.
Keep selected.
7. New Raster Layer.
Floodfill with the goldfill.
Selections - Modify - Contract by 5.
Hit your delete key.
Keep selected.
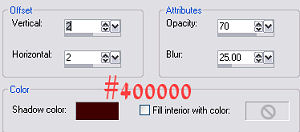
8. Repeat Step 5 - The Cutout.
9. Repeat Step 6 and 7.
10. Repeat Step 5 - The Cutout.
11.Selections - Select none.
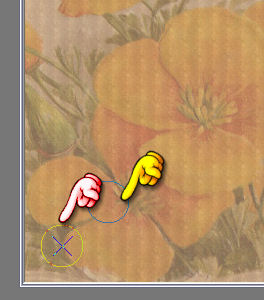
You should have 11 layers in your Layer Palette.
Close off Layers 1 and 2, by clicking on the little eye.
See settings below...
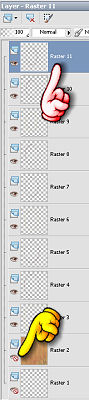
The yellow hand points to the little eye.
Be certain that one of the layers
that is not turned off is highlighted.
See red hand above.
Layers - Merge visible.
Turn the other layers back on, by clicking on the little eyes.
12. In the layer palette, highlight layer 2, the background layer.
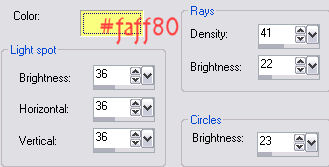
Effects - Illumination Effects - Sunburst.
See settings below...
13. Let's add our photograh...
Open your photograph, and resize it,
to more or less fit in the center of our golden ellipse.
If you would like to 'mist'your photograph,
just click on 'Misting' below...

Edit - Copy.
I am using the beautiful painting, 'Fairy's Fairy' by Josephine Wall.
You may see more of her wonderful artwork
'Here'
14. Activate your working image.
Edit - Paste - As a new layer.
Resize again, if necessary.
Move this layer below the Merged Layer.
15. Still on the photo layer...
Effects - Illumination Effects - Sunburst.
See settings below...

16. Open your copy of Mangels designs - Floral 4-13.
Image - resize - 16%.
Image - Mirror.
Adjust - Sharpness - Sharpen.
Set aside for the moment.
17. We are going to clone some of the resized floral 4-13.
See clone settings below...
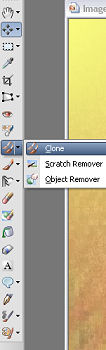
With the resized, mirrored copy of floral 4-13 active,
hold down the Shift key,
and click the clone brush on the lower left corner,
where the flowers are.
The yellow hand points to the clone brush.
*note* I lost the shape of the clone brush in my screen capture.
The red hand points to the spot where the cloning will begin.
You will see this moving, as you begin the next step.
18. Activate your working image.
Reduce the viewing to approximately 60%.
This makes it easier to view both images in psp workspace.
New Raster Layer.
Begin cloning the flowers on your working image,
by moving the brush around beginning in the bottom left corner.
Keep moving the mouse around, until you have cloned
all of the flower area.
Don't worry about the light edges.
We will fix that next.
19. Once you have finished cloning,
advance the viewing of your working image to at least 200%.
This makes it easier to see the parts that have to be erased.
Click on the Eraser Tool.
See settings below...

Begin erasing the light beige areas,
going closely in, over parts, and around the flowers.
You will erase some of the edges,
but this will give a pretty misted look,
as the eraser will fade
out some of the flower edges.
20. Layers - Merge - All Flattened.
21. Open the Mangels Designs - Corner 33.
Resize - 85%.
Edit - Copy.
Activate your working image.
Edit - Paste as a new layer.
Move into position to the top left.
22. Choose your favorite font and add some text, or a nice quote.
Layers - Merge - All Flattened.
23. Image - Add borders - 4px - white.
Select with the magic wand.
Floodfill with the goldfill.
Selections - Select none.
24. Image - Add borders - 40px - white.
Select with the magic wand.
Activate the Mangels Designs floral 4-13, that you did the cloning from.
Edit - Copy.
Back to your working image.
Edit - Paste into selection.
Effects - Plugins - Gregs Factory Output- VolII - Pool Shadow.
Use default settings.
Selections - Select none.
25. Repeat Step 23.
I hope you enjoyed my tutorial.


Dianne McFarlane
E-Mail: sdmcfarlane@nf.sympatico.ca
©Vision Designs
|