
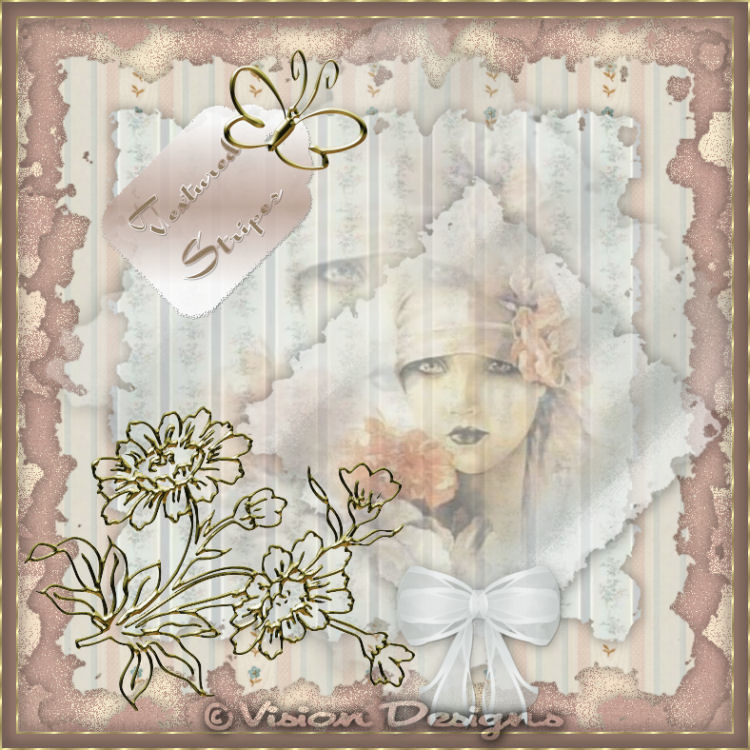

This tutorial has been created by
Vision Designs
for
Mangels Designs

Supplies Needed...
Paint Shop Pro - Version 10,
but should work with other versions, as well.
Mangels Designs - Textured Papers from the Printing Papers Collection
Textured 1-2
Textured 4-8
Textured 8-15
Mangel Designs - Golden Ornaments
Floral - 22
Butterfly - 23
Mangels Designs - Tags from the Scrapbooking Elements Collection
Tag 18
Plugins - AAA Filters - Scatter
Mask - Ancient paper
Just unzip, and place the mask in your Masks folder in psp,
You may download the mask
'here'
Thank you to Susan Gabriel, of Sue Angel Designs,
for allowing me to use her pretty organza bow.
Susan is a member of The Designers Team for Mangels Designs.
The bow is from Susan's 'Sherbet Bows and Tags'Collection.
I chose the 'green grunge bow'.
You may visit Susan's site by clicking on the banner below...
Just go to her site and click on the 'MORE'sign under 'Page Kits',
and you'll find the bows in the 'Sherbet and Shorts Kit'.
I always work in Layers - this gives you the opportunity
to change things, delete things, or move things around,
as you proceed with your design.
Ok, Let's get started...
Remember to save often.
1. Open all the supplies listed above.
Windows - Duplicate. Close the originals.
Scroll to view at 100%.
Using the Selection Tool, set to square, select a large portion
of each of the 'Textured Papers'.
On the Mangels Designs - Textured 8-15 paper,
shift-D, to duplicate it.
We're going to colorize the copy.
Adjust - Hue and Saturation - Colorize.
Hue - 117
Saturation - 10.
Minimize everything in your workspace in psp.
2. Open a new transparent image - 800 x 800px.
Floodfill this layer with the Textured 8-15.
Angle - 0
Scale - 100
We want the darker shade on both the left and right edges .
Selection Tool - Set to square.
Draw the selection to include the darker tone on both
the left and right edges.
Image - Crop to selection.
Your working image will now be a smaller square.
Image - Resize - 750 x 750 px.
Resize - All Layers - TICKED.
3. Effects - Plugins - AAA Filters - Scatter.
See settings below...

Repeat this effect one more time.
4. In the Layer Palette, Right-click on layer 1,
Duplicate.
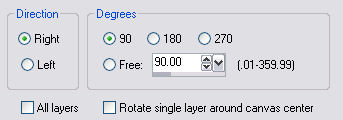
On the duplicated layer - Image - Free Rotate - 90 degrees to the Right.
See settings below...
*NOTE* As rotating an image, always causes
a dullness, or fuzziness, on the image,
you should always sharpen your image, after using it.
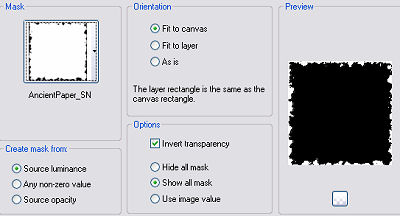
5. Layers - Load/Save Mask - Load mask from disk.
Choose the 'Ancient Paper' Mask.
See settings below...
6. Effects - 3D effects - Drop Shadow.
See settings below...
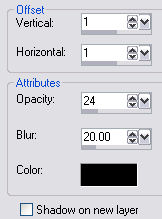
Repeat the 'drop Shadow', except change the V and H to minus 1.
7. New Raster Layer.
Floodfill this layer with Textured 1-2.
8. Layers - Load/Save Mask - Load mask from disk.
Choose the same mask,
Except this time, UNTICK the Invert Transparency Box.
Layers - Merge group.
9. On this same layer...
Image - Resize - 90%.
Resize all layers - UNTICKED.
10. Repeat Step 6 - the drop shadow.
11. New Raster Layer.
Floodfill with Textured 4-8.
Scale set to 138.
*NOTE* The scale will depend upon your previous resizing from Step 1.
12. Repeat Step 8 - The mask.
13. Image - Resize 75%.
Resize all layers - UNTICKED.
14. Repeat Step 6 - The drop shadow.
15. New Raster Layer.
Floodfill with the colorized textured 8-15.
Repeat Step 3 - The plugin.
16. Repeat Step 8 - The mask.
17. Image - Resize 50%.
Repeat Step 6, the drop Shadow.
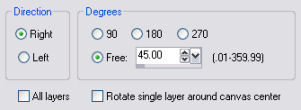
18. Image - Free rotate - 45 degrees.
See settings below...
19.Open your favorite photograph.
Resize it to fit the above layer.
Optional - If you would like to 'mist'your photograph,
just click on 'Misting' below...
I am using one of Sara Moon's beautiful paintings.
You may see more of this beautiful artwork by visiting
'HERE'.
When ready, Edit - Copy
Activate your working image.
Edit - Paste as a new layer.
20. In your layer palette,
close of all of the layers, except for the
photograph layer, and the colorized striped layer.
Close off, by clicking on the small eye.
See Screenshot below...
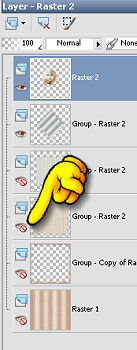
*Important* - Be certain that one of the layers (not turned off) is activated.
Layers - Merge visible.
Turn the other layers back on by clicking on the small eye.
21. Move the 'Merged' Layer to the bottom right.
See my final.
Reduce the opacity of this layer to 79,
or to a setting that suits your particular photograph.
22. Still on the same layer,
R-click - Duplicate.
Image - Resize 135%.
This , again, will depend upon you photograph,
as long as it is larger.
Be certain to UNTICK - Resize all layers.
Move the 'Copy of Merged Layer' below the 'Merged Layer'.
Reduce the opacity of this layer to 44,
or to a setting of your choosing.
We want the pretty backgrounds to peek through.
Move this layer into place as you see in my final.
It is a little difficult to see,
but I think you can get the idea.
23. Open up the Susan Gabriel-Sherbet Bows and Tags.
I chose the 'green grunge bow'.
Window - Duplicate - Close the original.
Image - Resize - 12%.
Resize - All Layers - TICKED.
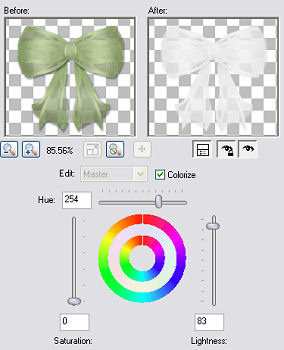
We want to change the color of the bow to match our piece.
Image - Adjust - Hue and Saturation - Hue/Saturation/Lightness.
See settings below...
Edit - Copy.
Back to working image.
Paste - as a new layer.
Move into position, as you see in my final.
24. Open the Mangels Designs - Golden Ornaments - Floral 22.
Edit - Copy.
Activate your working image.
Edit - Paste as a new layer.
Move to bottom left.
25. Open Mangels Designs - Golden Ornaments - Butterflies 23.
Windows - Duplicate.
Close the original.
Image - Resize - 24%.
Back to working image.
Paste - as a new layer.
Move into position, as you see in my final.
26. Open Mangels Designs - Tags 8.
Windows - Duplicate.
Close the original.
Image - Resize - 34%.
Back to working image.
Paste - as a new layer.
Image - Free Rotate - Left - 45 degrees.
UNTICK - All layers.
Move into position, as you see in my final.
Move this layer below the 'Butterfly Layer'.
27. I decided to add some color to my tag.
Still on the Tag Layer - Selections - Select All.
Selections - Float.
Selections - Defloat.
Keep selected.
Foreground Box - #b39587
Background Box - white
Choose Foreground/Background Gradient.
Repeats - 0, Angle - 0
New Raster Layer.
Floodfill the selected layer with the gradient.
Reduce the opacity of this layer to 75.
Selections - Select none.
28. Layers Merge - All flattened.
29. Place some text on your tag.
I added some borders, so my image would show up nicely in my tutorial.
We have finished our page.
I hope you're pleased with the results.
Thank you for trying my tutorial.


Dianne McFarlane
E-Mail: sdmcfarlane@nf.sympatico.ca
©Vision Designs
|