
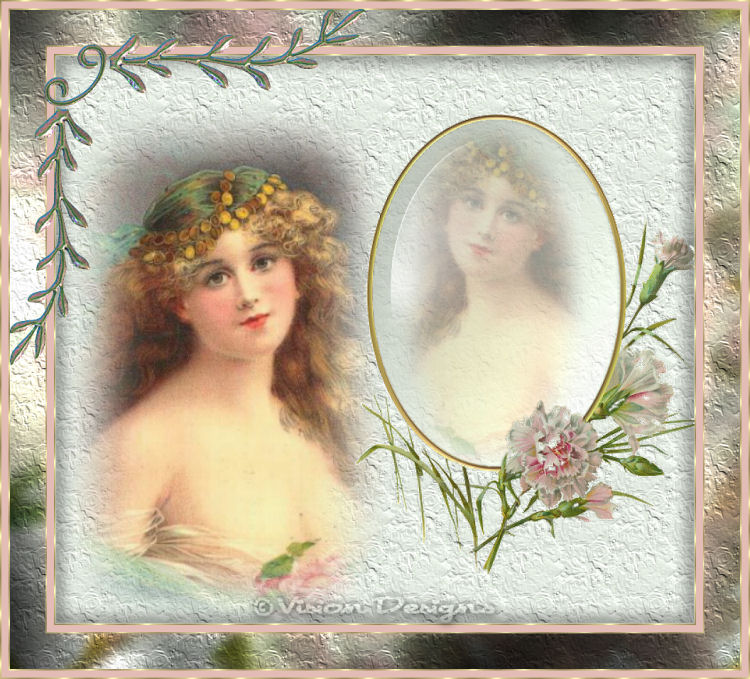

This tutorial has been created by
Vision Designs
for
Mangels Designs

Supplies Needed...
Paint Shop Pro - Version 10,
but should work with other versions, as well.
Mangels Designs - Authentic Centennial Victorian Photo Albums
Album #11 - mangels-milesdemarcos-victorian94
Mangels Designs - Photo Corners Gallery
Corner 118
Goldfill
You may R-click on the swatch above, and save it to your harddrive.
Put it in your Patterns Folder in psp.
Plugins...
Eye Candy 4000 - Glass
Gregs Factory Output - Vol II - Pool Shadow
SDM_Floral Texture - This is one of my own textures.
Just unzip, and place the texture in the Textures folder in psp.
You may download the texture
'here'
I always work in Layers - this gives you the opportunity
to change things, delete things, or move things around,
as you proceed with your design.
Ok, Let's get started...
Remember to save often.
1. Open mangels-milesdemarcos-victorian 94.
Image - Duplicate. Close the original.
Resize to 21%.
2, We're going to select the frame and floral part,
as I want to apply a texture to the background.
With the magic wand, tolerance set to approximately 60,
click on the frame.
Holding down the Shift-key, keep clicking with the
magic wand to select every part of the frame and flowers.
If you find you are getting too much of the background,
just lower the tolerance, and keep clicking with the magic wand,
until you are able to select all of it,
without including the background.
You may make this part a litte easier,
by advancing the viewing to larger that 100%.
Edit - Copy.
Edit - Paste as a new image.
Set aside for the moment.
3. Foreground color - #e6ede3.
This is the color from the original background.
4. Open a new transparent image - 900 x 800px.
Floodfill with the chosen foreground color.
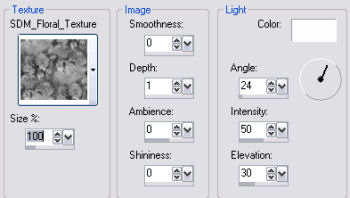
Effects - Texture Effects - Texture.
Choose the SDM_Floral_Texture.
See settings below...
5. Activate the framed selection from Step 2.
Edit - Copy.
Back to your working image...
Edit - Paste as a new layer.
I enlarged mine a little.
Image - Resize - 125%.
Adjust - Sharpness - Sharpen.
6. Still on the frame layer...
using the magic wand, click in the center of the frame.
Selections - Modify - Expand by 5.
7. New Raster Layer.
Floodfill this layer with the foreground color.
Reduce the opacity of this layer to 69.
Move this layer below the frame layer.
R-click on this layer, and Rename it.
I named mine 'pic'.
Selections - Select none.
8. Open your photograph.
Resize it to fit just inside your working image.
Mist your photograph, using a rounded rectangle.
Click on 'Misting' below to see my tutorial.

Edit - Copy.
9. Activate your working image.
Edit - Paste - As a new layer.
Move into position to the left, as you see in my final.
10. With the previous layer still active,
using the selection tool, set to ellipse, feather 44,
draw an ellipse to include as much of the pic as possible.
Edit - Copy.
Selections - Select - none.
11. Right-click on the grey part at the top of your working image.
Edit - Paste - As a new layer.
12. Working on this new layer,
Image - Mirror.
Move the mirrored image into the frame.
Resize your image if necessary.
*Note*...Don't forget to UNTICK - Resize all layers.
Reduce the opacity of this layer to 48.
This setting will depend upon your particular photograph.
13. In your layer palette,
close off the all the layers, except for the 'pic' layer
and the layer with your mirrored ellipse on it,
by clicking on the little eyes.
See screen capture below...
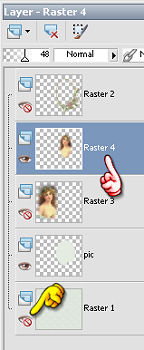
The yellow hand points to the little eyes.
Be certain that one of the layers that is not closed off is highlighted.
See the red hand above.
Layers - Merge visible.
14. Put two light tones from your original background in the
foreground and background boxes of the Materials Palette.
15. Effects - Plugins - Eye Candy 4000 - Glass
See settings below...
*Note*...There are three tabs to check settings for in EC.
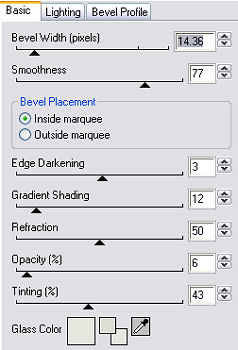
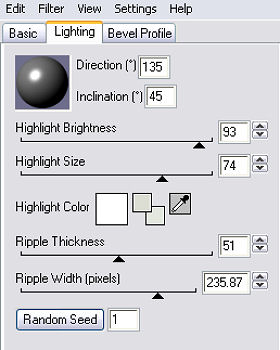
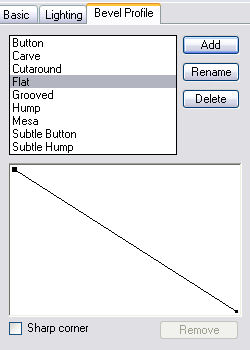
Layers - Merge - All flattened.
16. Image - Add borders - 2px - white.
Select with magic wand.
Floodfill with the goldfill.
17. Effects - 3D Effects - Drop Shadow.
See settings below...
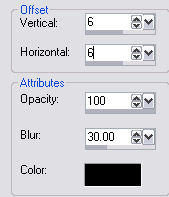
Repeat the Drop Shadow,
except change the V and H to minus 6.
Selections - Select none.
18. Image - Add borders - 10px - white.
Select with magic wand.
Floodfill with #e3bcb5.
Selections - Select none.
19. Repeat Step 16.
Selections - Select none.
20. On your working image,
using the Selection Tool, set to square, feather 0,
draw a square on the flower part of the frame.
See below...
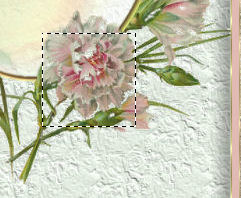
Edit - Copy.
Selections - Select none.
21. Image - Add borders - 50px - white.
Select with magic wand.
Edit - Paste - Into selection.
Adjust - Blur - Gaussian Blur - Radius 7.
Effects - Plugins - Gregs factory Output, Vol II - Pool Shadow.
Use Default Settings.
Effects - Texture Effects - Texture.
Choose the SDM_Floral_Texture.
Same settings as before.
Selections - Select None.
22. Repeat Step 16 - The goldfill border.
Note - Choose a color that is not in the previous border,
otherwise when you try to select, the magic wand will take part of the colored border,
and we only want to select the small border.
23. Repeat Steps 18 and 19.
24.Open Mangels Designs - Photo Corners - Corner 118.
Edit - Copy.
Activate your working image.
Edit - Paste - As a new layer.
Move into position as you see in my final.
These Victorian Photo Albums' are soooo pretty, just by themselves.
I found myself really drawn to them,
and almost ashame to do too much to them.
I decided to try one with a mirror image.
I hope you like my result.
Thank you for trying my tutorial.


Dianne McFarlane
E-Mail: sdmcfarlane@nf.sympatico.ca
©Vision Designs
|