


In Part E, we're going to work on the water and ice.
It is most important to remember that whenever you paint water,
that all lines that you may add, MUST be painted in straight lines,
parallel with the bottom of your painting.
So, tuck this information aside somewhere...
it is crucial to making great water in your painting.
47. Ok...Let's begin with the water.
Highlight the layer with the outline of your water.
With your magic wand, click in the center of the water to select it.
*note*...If by chance you get the ice as well,
it means that the lines aren't quite joined together.
At this point you can just redraw the water and ice lines, again...
Remember to put each set on it's own layer.
Once you have the water selected, floodfill with a deep blue tone.
I used #364264.
Foreground color - #060c49.
You may find these colors a little bright, so you may choose your own colors,
OR colorize it as I did , when I got it finished...
*note*...This color just needs to be a little darker than your water color.
Using your paint brush, stroke some of this color
along the shorelines, more on the left side than the right side.
Smudge with the smudge brush.
Remember to stroke and smudge in straight lines,
working horizontially across the water from left to right and vice versa.
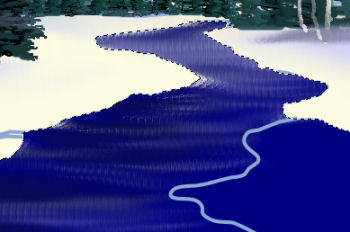
Now with the paint brush, size 1 or 2, paint some white straight lines in your water.
Smudge the white lines to blend them into the water.
This will create some light and sparkle to the water.
See illustration below...
Ignore the ice in this illustration,
as the screenshot was taken before I properly drew in the ice. *S*...
48. You may keep adding colors, and smudging until you're pleased with your effect.
I decided to put some dark green in my water,
along the left side, just to reflect the trees a little.
Selections - Select None.
49. The Ice...
Highlight your ice layer.
With your magic wand, click in the center of your ice.
If you can't get it to select properly,
with the ice layer highlighted,
Selections- Select All.
Selections - Float.
Selections - Defloat.
50. Floodfill with a bluish tone from your sky.
I used # 8694ba.
51. With your paint brush, paint some darker blue (color same as your water),
on the ice along the shoreline, and some white along the edge by the water.
Smudge, horizontally, from left to right and vice versa.
Reduce the opacity of the ice layer to about 68.
Keep selected.
52. Now...Highlight the water layer, and tidy up
the edge next to the ice, by smudging the water toward the ice.
53.Selections-select None.
Close off all the layers except for the ice and water.
Merge these two layers.
Carefully smudge the water into the edge of the ice, to make it look transparent.
See illustration below...

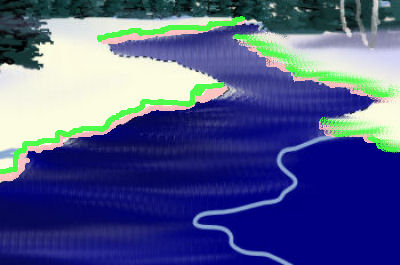
54. Next we're going to work on the water edges.
Water runs under the snow, giving the appearance of the snow being darker on the water edges.
Foreground color - #7470a7.
Paint Brush - about size 5.
Gently run an irregular line along the river banks, next to the water.
In the illustration below, I did them in pink, so you can see where to put them.
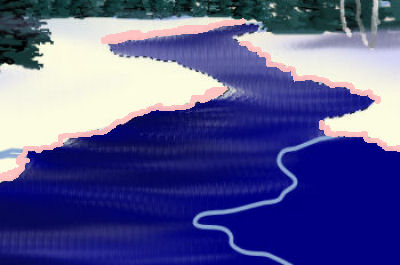
Smudge gently here and there, following the shape of your lines.
Foreground color - white.
Paint an irregular snow line, on the snowbank side of the line you've just made.
This can be a hit or miss line, partially on or over the previous line,
and gently smudge this white line back toward the snowbanks.
Don't worry if it looks perfect just yet, as we'll be dealing
with the snowbanks a little more, toward the end of our painting.
See illustration below...
I painted mine in green so it would be more visible...
Save as 'winterscenepaintinge.psp'.
We're ready for Part F.


Dianne McFarlane
E-Mail: sdmcfarlane@nf.sympatico.ca
©Vision Designs
|